
How to Can Tomatoes

With canned tomatoes, enjoy that garden-fresh tomato taste in sauces, soups and stews all year long! Here’s how I can tomatoes:
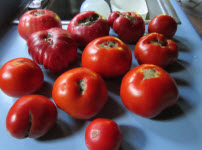 First, when it comes to canning tomatoes for the rest of the year, I like to let my tomatoes
get super-ripe on the vine. Farmers really don’t have this luxury as
the fruit becomes too easy to bruise at this stage. However,
tomatoes will continue to ripen in the box or on the counter, so it’s
best to purchase your canning tomatoes a few days in advance of
the processing.
First, when it comes to canning tomatoes for the rest of the year, I like to let my tomatoes
get super-ripe on the vine. Farmers really don’t have this luxury as
the fruit becomes too easy to bruise at this stage. However,
tomatoes will continue to ripen in the box or on the counter, so it’s
best to purchase your canning tomatoes a few days in advance of
the processing.
I also like to incorporate other flavors with my tomatoes because it is only in the summer that I have access to fresh basil, oregano, thyme and garlic.
 While
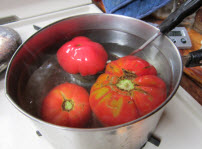
the onions and pepper are cooking, I set a pot of water to boil as I
wash the tomatoes. Then, using a slotted spoon, I dip the tomatoes
(maybe three or four at a time) into the boiling water until the skins
slip or about 30 seconds. Removing them with the spoon, they immediately
go into a pan of cold water. They are then placed on a clean countertop
while I do the rest of them. Once all the skins are loose, I cut out
the stem and tough part of the inside and pull off the skin. Placing the
tomato on a cutting board, it gets cut into small pieces.
While
the onions and pepper are cooking, I set a pot of water to boil as I
wash the tomatoes. Then, using a slotted spoon, I dip the tomatoes
(maybe three or four at a time) into the boiling water until the skins
slip or about 30 seconds. Removing them with the spoon, they immediately
go into a pan of cold water. They are then placed on a clean countertop
while I do the rest of them. Once all the skins are loose, I cut out
the stem and tough part of the inside and pull off the skin. Placing the
tomato on a cutting board, it gets cut into small pieces.
 This,
of course, is the “proper” way to cut up the tomatoes, but I often do
the “Lucy” (more fun) version. Making sure that I have clean hands, I
stand above the compost bucket, pull off the skins and mush the tomatoes
into the pot with my hands and through my fingers (reserving the stem
and tough interior). This tactile experience is quite exhilarating.
This,
of course, is the “proper” way to cut up the tomatoes, but I often do
the “Lucy” (more fun) version. Making sure that I have clean hands, I
stand above the compost bucket, pull off the skins and mush the tomatoes
into the pot with my hands and through my fingers (reserving the stem
and tough interior). This tactile experience is quite exhilarating.
Stirring frequently, I slowly add all of the tomatoes to the pot. I then wash several bunches of basil, oregano and thyme and peel quite a few cloves of garlic. Using a garlic press, a small chopper or a food processor, the garlic gets diced into very small pieces and added to the mix. The other spices then get torn into small pieces and also tossed into the pot. The mix is now ready to cook for about an hour in order for all of the flavors to blend together.
It’s important to be sure that this blend remains mostly tomatoes. We want the mix to be acid in order to be able to preserve it properly. Also—stay away from low acid tomatoes (a few are fine, but not too many).
 Once
the water is boiling, we are ready to continue. I use a funnel over the
top of the jar when I ladle my special mixture into it. Be sure to
leave 1 inch of head space at the top. Next comes a VERY IMPORTANT
step—it’s absolutely critical to wipe off the top of the jar with a
cloth before putting on the lid. Any tiny particle of food left on the
rim will cause a jar to not seal. Pop on the lid, adjust the screw band
(tightly) and place in the water bath with jar “tongs”.
Once
the water is boiling, we are ready to continue. I use a funnel over the
top of the jar when I ladle my special mixture into it. Be sure to
leave 1 inch of head space at the top. Next comes a VERY IMPORTANT
step—it’s absolutely critical to wipe off the top of the jar with a
cloth before putting on the lid. Any tiny particle of food left on the
rim will cause a jar to not seal. Pop on the lid, adjust the screw band
(tightly) and place in the water bath with jar “tongs”.
Make sure that everything continues in a soft boil and that there is at least 1 inch of boiling water above the top of the jars. Put the cover on the pot and start timing the processing; 40 minutes for pints and 45 minutes for quarts. A small battery timer is handy for this. After cleaning up the accrued dishes, I take a break and read while my jars are dancing away.
Once the timer dings, I turn off the stove and very carefully take the top off of the pot so that the steam goes away from me. With a nice trivet on the table or counter nearby, I slowly take out each jar (again with the “tongs”) and place it to cool. Be sure that the trivet is not located in a draft as a cold breeze can crack the jars at this point. This is also why I move them slowly.
Once all of this has been accomplished, I generally call it a day. There will be a noticeable (and reassuring) “pop” as the individual jars seal. I look lovingly at my beautiful trivet of summertime bounty and I wait until the next day to finish the job.
 The
jars are cool by morning. I take off the screw bands (carefully)
because they sometimes get food on them and leaving them on makes them
rust. They get washed and put aside for next year. I label each and
every lid (this way you won’t have to scrub any labels off of the jar
because the lid gets tossed anyway) with the year and the contents. Into
the pantry go the canned tomatoes to await use in canned tomato soup, stews, American chop suey (I cook the elbows right in the mix) or anything else I decide to make during the long winter months. Yum!
The
jars are cool by morning. I take off the screw bands (carefully)
because they sometimes get food on them and leaving them on makes them
rust. They get washed and put aside for next year. I label each and
every lid (this way you won’t have to scrub any labels off of the jar
because the lid gets tossed anyway) with the year and the contents. Into
the pantry go the canned tomatoes to await use in canned tomato soup, stews, American chop suey (I cook the elbows right in the mix) or anything else I decide to make during the long winter months. Yum!
If you need more advice on how to can your vegetables, or are looking to can more than just tomatoes, try our vegetable canning guide. If you feel that you’d rather dry your tomatoes than can them, learn how here. Whatever you choose, good luck making the most of your tomato harvest!
Have more information and a detailed, how-to guide for living a sustainable and independent life at your fingertips. Celeste’s “Celeste’s Garden Delights” provides step by step information on gardening, canning, freezing, drying, fermenting, backyard chickens and so much more! From a satisfied customer “I was privileged to be at your lecture at Debra’s. I have already shared your book with others and find it on par with Crockett’s Victory Garden (my bible) for help with planting and in a category all its own for all other aspects of healthy living.” –Lee Edmands
First, when it comes to canning tomatoes for the rest of the year, I like to let my tomatoes
get super-ripe on the vine. Farmers really don’t have this luxury as
the fruit becomes too easy to bruise at this stage. However,
tomatoes will continue to ripen in the box or on the counter, so it’s
best to purchase your canning tomatoes a few days in advance of
the processing.I also like to incorporate other flavors with my tomatoes because it is only in the summer that I have access to fresh basil, oregano, thyme and garlic.
Canning Supplies for Canning Tomatoes
- Super-ripe tomatoes, fresh herbs, extra-virgin olive oil, onions, red peppers, salt
- Heavy cooking pot with boiling water, pan of cold water
- Slotted spoon
- Knife and cutting board
- Small chopper or food processor for garlic
- Canning jars and lids (as many as needed), screw band, cloth to wipe the jars, jar tongs
- Funnel and ladle
- Marker to label cans
Preparation for Canning Tomatoes
I place some extra-virgin (organic) olive oil to thoroughly cover the bottom of a heavy cooking pot. I then take a few onions and a red pepper and cut them into smallish pieces and drop them into the pot. Adding a dash of salt, I let these cook until they are soft.While
the onions and pepper are cooking, I set a pot of water to boil as I
wash the tomatoes. Then, using a slotted spoon, I dip the tomatoes
(maybe three or four at a time) into the boiling water until the skins
slip or about 30 seconds. Removing them with the spoon, they immediately
go into a pan of cold water. They are then placed on a clean countertop
while I do the rest of them. Once all the skins are loose, I cut out
the stem and tough part of the inside and pull off the skin. Placing the
tomato on a cutting board, it gets cut into small pieces.This,
of course, is the “proper” way to cut up the tomatoes, but I often do
the “Lucy” (more fun) version. Making sure that I have clean hands, I
stand above the compost bucket, pull off the skins and mush the tomatoes
into the pot with my hands and through my fingers (reserving the stem
and tough interior). This tactile experience is quite exhilarating.Stirring frequently, I slowly add all of the tomatoes to the pot. I then wash several bunches of basil, oregano and thyme and peel quite a few cloves of garlic. Using a garlic press, a small chopper or a food processor, the garlic gets diced into very small pieces and added to the mix. The other spices then get torn into small pieces and also tossed into the pot. The mix is now ready to cook for about an hour in order for all of the flavors to blend together.
It’s important to be sure that this blend remains mostly tomatoes. We want the mix to be acid in order to be able to preserve it properly. Also—stay away from low acid tomatoes (a few are fine, but not too many).
How to Can Tomatoes
Wash the canning jars and lids and place aside. Jars get used year after year, but lids can only be utilized once. Fill a canner ¾ full of water and set on the stove to boil. Line up the jars and put 1 teaspoon salt in the quarts or ½ teaspoon of salt in the pints (salt, like sugar, is a preservative).Once
the water is boiling, we are ready to continue. I use a funnel over the
top of the jar when I ladle my special mixture into it. Be sure to
leave 1 inch of head space at the top. Next comes a VERY IMPORTANT
step—it’s absolutely critical to wipe off the top of the jar with a
cloth before putting on the lid. Any tiny particle of food left on the
rim will cause a jar to not seal. Pop on the lid, adjust the screw band
(tightly) and place in the water bath with jar “tongs”.Make sure that everything continues in a soft boil and that there is at least 1 inch of boiling water above the top of the jars. Put the cover on the pot and start timing the processing; 40 minutes for pints and 45 minutes for quarts. A small battery timer is handy for this. After cleaning up the accrued dishes, I take a break and read while my jars are dancing away.
Once the timer dings, I turn off the stove and very carefully take the top off of the pot so that the steam goes away from me. With a nice trivet on the table or counter nearby, I slowly take out each jar (again with the “tongs”) and place it to cool. Be sure that the trivet is not located in a draft as a cold breeze can crack the jars at this point. This is also why I move them slowly.
Once all of this has been accomplished, I generally call it a day. There will be a noticeable (and reassuring) “pop” as the individual jars seal. I look lovingly at my beautiful trivet of summertime bounty and I wait until the next day to finish the job.
The
jars are cool by morning. I take off the screw bands (carefully)
because they sometimes get food on them and leaving them on makes them
rust. They get washed and put aside for next year. I label each and
every lid (this way you won’t have to scrub any labels off of the jar
because the lid gets tossed anyway) with the year and the contents. Into
the pantry go the canned tomatoes to await use in canned tomato soup, stews, American chop suey (I cook the elbows right in the mix) or anything else I decide to make during the long winter months. Yum!If you need more advice on how to can your vegetables, or are looking to can more than just tomatoes, try our vegetable canning guide. If you feel that you’d rather dry your tomatoes than can them, learn how here. Whatever you choose, good luck making the most of your tomato harvest!
Have more information and a detailed, how-to guide for living a sustainable and independent life at your fingertips. Celeste’s “Celeste’s Garden Delights” provides step by step information on gardening, canning, freezing, drying, fermenting, backyard chickens and so much more! From a satisfied customer “I was privileged to be at your lecture at Debra’s. I have already shared your book with others and find it on par with Crockett’s Victory Garden (my bible) for help with planting and in a category all its own for all other aspects of healthy living.” –Lee Edmands
About This Blog
Celeste
Longacre has been growing virtually all of her family’s vegetables for
the entire year for over 30 years. She cans, she freezes, she dries, she
ferments & she root cellars. She also has chickens. Celeste has also enjoyed a longtime relationship with The Old Farmer’s Almanac as their astrologer and gardens by the Moon. Her new book, “Celeste’s Garden Delights,” is now available! Celeste Longacre does a lot of teaching out of her home and garden in the summer. Visit her web site at www.celestelongacre.com for details.


No comments:
Post a Comment