Hello

Hello
A magical place

Monday, October 31, 2016

Pumpkin Cake Pops

Pumpkin-Shape Desserts that Beat Halloween Candy  By Cathy Roma of What Should I Make For...

These pumpkin-shape desserts are bringing some serious cuteness to the season. Cupcakes, cookies, cake pops -- we've got your favorite fall treats, no carving station required!

Sunday, October 30, 2016

White Chocolate Cookie Butter Popcorn

White Chocolate Cookie Butter Popcorn
From: Jenn@eatcakefordinner
(Printable Recipe)

16 c. popped popcorn (1/2 c. kernels)
1 (12 oz.) pkg. Wilton white candy melts
1/4 c. Trader Joe's Cookie Butter
1/2 c. Wilton orange candy melts 
sprinkles, opt.

Pop kernels according to your popcorn popper's directions.  Place popped popcorn into a very large bowl (I use a 32-cup size bowl).  Make sure to remove all un-popped kernels; set aside.  Place white candy melts and cookie butter into a medium microwave-safe bowl.  Microwave until candy melts are melted and mixture is smooth, stirring every 30 seconds.  Pour over popped popcorn and stir together until popcorn is evenly coated in mixture.  You might not think there is enough coating to cover all that popcorn, but there really is, so just keep stirring until it's all coated.  

Spread out onto a large cookie sheet.  Melt 1/2 cup of orange candy melts in a small, microwave-safe, bowl until smooth and creamy, stirring every 30 seconds.  Using a fork drizzle over popcorn and then top with sprinkles.  Allow to set and then break into chunks and serve.  

Jenn's Notes: I used Trader Joe's Cookie Butter, but if you do not live near a Trader Joe's, you can try Biscoff Cookie Butter which can be found at your local grocery store by the peanut butter.  Also, if you do not have a popcorn popper, you can use plain microwave popcorn.    

Idea adapted from: I Heart Naptime

Have a wonderful day!


Saturday, October 29, 2016

Gardening Tips for United States

Gardening Tips for Places

This is a great web site for all us garden lovers. Check it out and enjoy.

http://www.almanac.com/gardening/tips/states

Recycled Art Ideas for Kids: Ladybug's Family from Plastic Bottles


Published on May 22, 2014
Here
is a simple project from recycled art ideas for kids. You can make a
whole family of ladybugs!Please thumb up! Previous Recycled Bottles
Crafts video:https://www.youtube.com/watch?v=UYHbR...

Subscribe to my main channel: http://www.youtube.com/recycledbottle...

12 Lovely Ladybug Crafts for Kids

I found this cute article to share and maybe create with kids in the Fall..........Spring time screams Ladybug Crafts to me! It seems like as soon as the warmer temperatures begin, we are sure to catch an eye on a Ladybug in our front yard. Their bright red color is vibrant in real life and also in crafts! Below you will find 12 Lovely Ladybug Crafts for kids that will surely get you excited for spring time crafting!
http://iheartcraftythings.com/12-lovely-ladybug-crafts-for-kids.html

Friday, October 28, 2016

10 Great Christian Pumpkin Carving Ideas

Christian Pumpkins
Bible Verses
If you don't want to carve a pumpkin, try writing Bibles verse on pumpkins with a black permanent marker.

Read more at http://www.beliefnet.com/love-family/galleries/10-great-christian-pumpkin-carving-ideas.aspx?p=10#zlCTzBG1zLSbwTeU.99


Sweet Potao Cake With marshmallow Frosting

Sweet Potato Cake with Marshmallow Frosting
From: Jenn@eatcakefordinner
(Printable Recipe)

1 1/2 c. all-purpose flour
1 tsp. baking powder
1/4 tsp. baking soda
1 1/4 tsp. cinnamon
1/2 tsp. ground nutmeg
pinch of ground cloves
2 eggs, slightly beaten
2 1/2 c. peeled, shredded, sweet potatoes*
3/4 c. packed light brown sugar
1/4 c. sugar
1/2 c. canola or vegetable oil
1 tsp. vanilla
chopped pecans, for garnish, opt.

Preheat oven to 350 degrees.  In a large bowl combine the flour, baking powder, baking soda, cinnamon, nutmeg and cloves; set aside.  In a medium bowl, combine the eggs, shredded sweet potatoes, brown sugar, sugar, oil and vanilla and mix until well blended.  Add wet ingredients to dry ingredients and stir together until just combined.  Do not overmix.  Pour batter into a greased 9x13-inch baking pan and spread out evenly.  Bake for 20 minutes or until top springs back when lightly touched and a toothpick inserted in the center comes out clean.  Cool completely and top with Marshmallow Frosting and chopped pecans, if desired.

*Note: It's best to grate the sweet potatoes on the medium or small side of the grater.  If you use the large side, the sweet potatoes don't get as soft during baking.  

Marshmallow Frosting
1/2 c. (8 Tbl.) unsalted butter, room temperature
1 (7 oz.) carton marshmallow creme
1/4 tsp. salt
1 tsp. vanilla
2 c. powdered sugar

In a medium bowl combine the butter, marshmallow creme, salt and vanilla and mix until creamy.  Add one cup of powdered sugar and mix until combined.  Add remaining one cup of powdered sugar and mix until smooth and creamy.  Frosting will be thick.  Carefully spread over cooled cake.
http://www.eatcakefordinner.net/2016/10/sweet-potato-cake-with-marshmallow.html

Apple Pie Cupcakes

Apple Pie Cupcakes
1 1/2 cups all purpose flour
1/4 tsp ground nutmeg
1 tsp baking powder
1/4 tsp baking soda
1/4 tsp salt
1/3 cup butter, room temperature
1 cup sugar
1 large egg
2 tsp vanilla extract
3/4 cup milk (pref. whole milk)
1 batch vanilla frosting
Preheat oven to 350F. Line a muffin pan with 12 paper liners.
In a medium bowl, whisk together flour, nutmeg, baking powder, baking soda and salt.
In a large bowl, cream together butter and sugar until light and fluffy. Beat in egg and vanilla extract until well-combined. Stir in half of the flour mixture, followed by the milk. Stir in the remaining half of the flour mixture, mixing just until no streaks of dry ingredients remain visible. Divide batter evenly into prepared muffin cups.
Bake for 16-19 minutes, or until the cakes spring back when lightly pressed and a toothpick inserted into the center of each cake comes out clean.
Take the cupcakes out of the pan and place them on a wire rack. Allow cupcakes to cool completely, then use a paring knife to cut a cone out of the center of each cupcake. Cut the point off of each cone, preserving the top.
Fill each cupcake with approx 2 tsp apple pie filling, then replace the top. Frost cupcakes with buttercream frosting. Make a well in the top of the frosting, then add 1 tsp apple pie filling to the well.
Makes 12.
Filling
2 large/ 3 medium apples
1 tbsp butter
4 tbsp brown sugar
1/2 tsp ground cinnamon
1/8 tsp ground allspice
1/8 tsp salt
1 tsp cornstarch
2 tsp water
Dice up the apples (skin can be left on) into small cubes, less than 1/4-inch x 1/4-inch.
In a large saucepan or skillet, melt the butter, add apple dice and saute until slightly softened. Add brown sugar and spices and cook, stirring frequently, until the sugar is dissolved and a bubbling sauce forms. Cook until apples are tender.
In a very small bowl, stir together cornstarch and water. Add to apple mixture and stir until thickened, about 2 minutes. Remove from heat and cool to room temperature.
Makes about 1 1/2 cups (depending on the size of the apples).  http://bakingbites.com/2016/10/apple-pie-cupcakes/

Thursday, October 27, 2016

Slow Cook Your Way to a Fit Body

Slow Cook Your Way to a Fit Body

Abs are not only made in the kitchen but also achieved in the crock pot. Slow cooker is just another name for crock pot and they have resurfaced as the hottest trend for healthy nutrition accountability. Crock pots come in a variety of shapes and sizes to suit your personal needs and allow for easy meal prep and getting ready for a busy week where cooking daily can be difficult. Selecting a large crock pot with a timer is the best way to cook multiple meals in one pot while you’re sleeping or off doing other things. It really takes the stress out of healthy cooking which is a common complaint with many who are trying to get fit and struggling with nutrition. Personally, I own two crock pots and have both going at the same time with differing things like steel-cut oats and lean meats. Whether I load them up before going to bed, prior to work, or using a weekend day for food prep, it is so awesome to have all my meals cooked for several days. Crock pots are not just for cold winter days but year-round slow cooking and there is nothing better than walking in from work or waking up to the house smelling like I have been cooking all day. I recommend purchasing several serving size seal-tight containers easily portable in a cooler to portion out your crock pot creations. Your slow cook leftovers will become a refrigerator full of grab and go meals for the week and keep you on track with eating healthy and reaching your fitness goals. The following crock pot meal ideas will help get you started:   https://www.verywell.com/slow-cook-your-way-to-a-fit-body-3121360?utm_campaign=livinghealthy&utm_medium=email&utm_source=cn_nl&utm_content=7962660&utm_term=bouncex12

How to Bulk Up Your Portion Sizes With Veggies

How to Bulk Up Your Portion Sizes With Veggies  

Like most people, I enjoy large servings of food without large calorie counts. That's why I super-size my dishes using vegetables. What does this mean? I find the perfect veggie and cooking method to expand the portion, without compromising the taste or adding a lot of calories. Check out some of my favorite super-sizing veggies and the best ways to use them.   https://www.verywell.com/how-to-bulk-up-your-portion-sizes-with-veggies-1087826?utm_term=bouncex12&utm_campaign=livinghealthy&utm_medium=email&utm_source=cn_nl&utm_content=7962660

Wednesday, October 26, 2016

The Reason Behind Shredding Leaves for Use as Compost, Mulch

A reader said he had heard of the practice of shredding leaves prior to using them as mulch but wondered about the reason behind it. Was it just to make it easier to dispose of the leaves, since, once shredded, the load would be more compact? Or was there some other benefit? My answer follows:

One Reason for Shredding Leaves: More Efficient Disposal

After raking leaves in the fall (the reason for which I explain here), you take the additional step of shredding them with a leaf shredder, lawn mower, or other device. Shredding leaves is a good idea regardless of whether your main interest is in disposing of them, producing leaf mulch, or producing compost. http://landscaping.about.com/cs/compostandmulch/f/leaf_shredding.htm

How to Dry or Cure Gourds

For thousands of years, gourds have been grown and used by many cultures as useful tools and utensils. We still grow many types of gourds, but today we mostly think of gourds as decorations and whimsical birdhouses or containers. If you'd like to learn how to make a gourd birdhouse, here's an easy step by step.)
Gourds are close relatives to pumpkins, squash and other vegetables in the Cucurbitaceae family, like cucumbers and melons, and they are just as easy to grow.

Types of Gourds

There are dozens of gourds, but 2 basic types are grown and used decoratively:  http://gardening.about.com/od/vegetables/a/DryingGourds.htm

Sunday, October 23, 2016

Surprising Causes of Weight Gain

It's true that we gain weight when we eat more than we can burn off. But according to some alternative medicine practitioners, this conventional diet wisdom does not always hold true. Weight gain may also be caused by certain health conditions. 
https://mail.google.com/mail/u/0/#inbox/157f1dabafe651a7

Friday, October 21, 2016

Spiced Apple Drops

http://www.bhg.com/recipe/spiced-apple-drops-1/?utm_source=bhg-newsletter&utm_medium=email&utm_campaign=bhgdailyrecipe_102116&did=86441
  • Makes: 6 servings
  • Yields: about 40 cookies
  • Prep: 30 mins
  • Bake: 10 mins 375°F per batch

Tip: Which Vegetables are Lowest and Highest in Carbs?

Most non-starchy vegetables are very low in carbohydrate -- less than 5 grams for half a cup worth. But there are differences between them. See this master vegetable list for complete information, but here is a quick rule, dividing vegetables into four groups, depending on what part of the plant they come from. There are exceptions, but as a general rule, this works pretty well.  https://www.verywell.com/carbs-in-vegetables-easily-remember-low-from-high-2241638?utm_campaign=livinghealthy&utm_medium=email&utm_source=cn_nl&utm_content=7917893&utm_term= 

Wednesday, October 19, 2016

Crochet Nativity Set

http://thewhoot.com.au/crochet/free-christmas-crochet?omhide=true&utm_source=The+WHOot+Daily+Mail&utm_campaign=17b34876b6-RSS_Feed_v4_custom&utm_medium=email&utm_term=0_bb6c322de2-17b34876b6-61501889

Spicy Buffalo Ranch Wingettes


Spicy Buffalo Ranch Wingettes | Moore's

Moore's has become a go-to place for dinner ideas my family eats up!  The convenience and great taste of their marinades and sauces, combined with simple ingredients and instructions, is a perfect recipe! Here's one for Spicy Buffalo-Ranch Wingettes - Bridgette loved these!
SpicyBuffaloRanchIngredients:
  • 12 chicken wingettes
  • 1 cup Moore's Creamy Ranch Buffalo Wing Sauce
  • 1 packet Ranch Dip, Dressing & Recipe Mix
  • Chili Powder
  • Salt & Pepper

Directions:

  1. In a gallon-size resealable plastic bag, combine the wings and Moore's Cream Ranch Buffalo Wing Sauce.  Seal bag and toss to coat evenly.  Refrigerate 4 to 8 hours.
  2. Preheat oven to 350 degrees F.  
  3. Place chicken on a greased baking sheet.  Sprinkle with 1 tsp. of Ranch Dip Mix and Chili Powder, salt and pepper.
  4. Bake, uncovered 40 to 50 minutes until golden brown, turning half way through cooking time.
  5. For some extra spice, add a few dashes of hot sauce on the hot wings.
  6. Mix Ranch Dip mix according to package directions.
  7. Refrigerate 30 minutes.
Moore's Marinades & Sauces always has great recipes and coupons at their website. Check them out and I bet you'll feel the urge to say "awesome-sauce!" lol

Kitchen Cheat Sheets You Simply Can't Live Without | The WHOot

Kitchen Cheat Sheets You Simply Can't Live Without | The WHOot

Button Bowls

Button Bowls look fabulous and they are so easy to make. It’s the perfect use for all those left over buttons and the results are stunning! http://thewhoot.com.au/whoot-news/crafty-corner/button-bowl?omhide=true&utm_source=The+WHOot+Daily+Mail&utm_campaign=17b34876b6-RSS_Feed_v4_custom&utm_medium=email&utm_term=0_bb6c322de2-17b34876b6-61501889

Tuesday, October 18, 2016

The Land Of LadyBugs

As Christians we all have our time to worship and that is very special moments that we cherish. God also gave us our fun time. Things that make us smile,or time spent with kids,friends and others we love. So I decided to share some fun things I like. I hope you stop in,grab a few recipes to try out,crafts for kids,and much more to come soon. Or maybe just come read a prayer for the day. I hope you enjoy and bright blessings to each and every one of you. Thank you and much Love, JudyBug :)

LadyBug Garden Tidbit Of The Month

LadyBug Garden Tidbit Of The Month

St.Lukes Indian Summer~Tidbit Of The Month

http://www.almanac.com/fact/st-lukes-little-summer-lovely-summerlike-days-saint
Lovely, summer like days that occur around October 18 are called Saint Luke’s Little Summer in honor of the saint’s feast day. Around this time, Saint Luke’s feast day, there is a period brief period of calm, dry weather. Of course, it’s difficult to generalize today across the vast continent of North America, but the temperature is usually mild and the leaf colors are turning a gorgeous color. It’s a good time for a brief vacation or visit to a park. In Venice, Italy, they say: “San Luca, El ton va te la zuca” (Pumpkins go stale on St Luke’s Day), but here in North America, pumpkins are enjoying their finest hour. Saint Luke is the patron saint of physicians and surgeons so it seems only fitting that the good doctor give us these calm days. In olden days, St. Luke’s Day did not receive as much attention in the secular world as St. John’s Day (June 24) and Michaelmas (September 29), so it was to keep from being forgotten that St. Luke presented us with some golden days to cherish before the coming of winter, or so the story goes. Some folks call this Indian Summer, but that officially occurs between November 11 and November 20.

When To Plant Mums

When To Plant Mums
Tip of the month

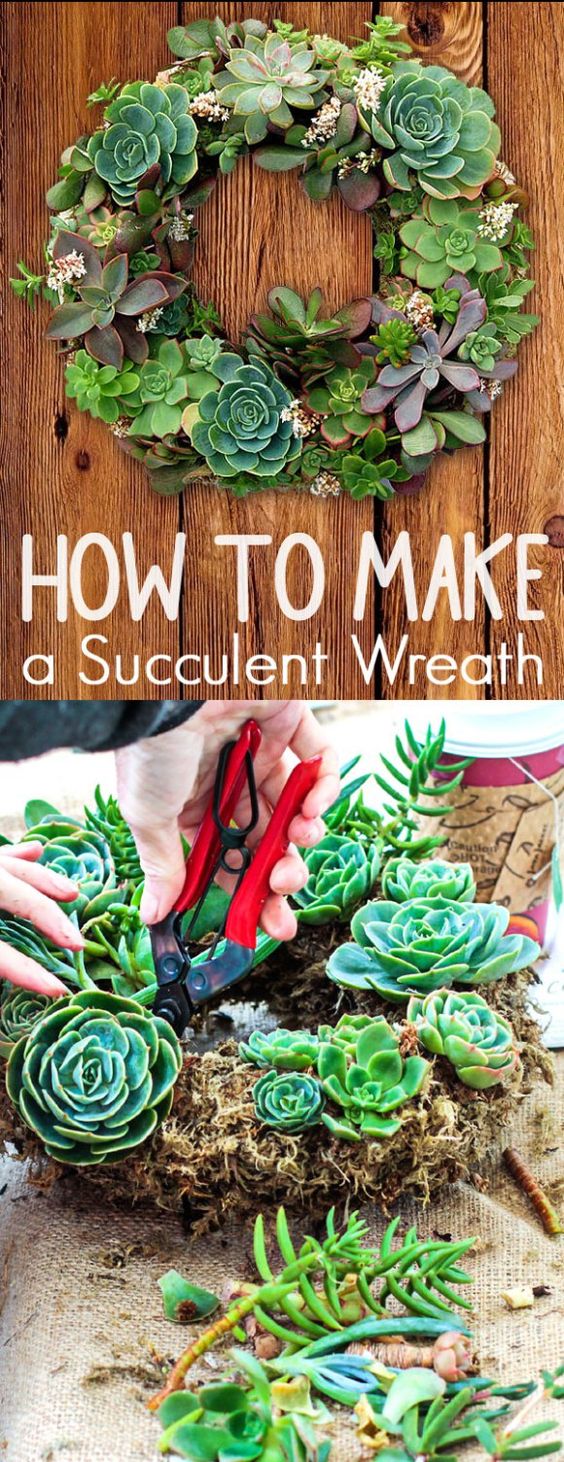
How To Make A Succulent Wreath

How To Make A Succulent Wreath
This turns Out So Pretty! Click on picture for directions

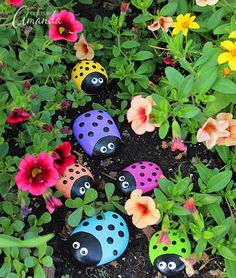
LadyBug Painted Rocks

LadyBug Painted Rocks
For Your Garden

Painted Garden Rocks

Learn to make these adorable ladybug painted rocks. use special outdoor paint for this adorable garden craft so you can keep garden ladybugs…

Ingredients

  • Patio Paint in colors of your choice (I used Larkspur Blue, Petunia Purple, Fiesta Yellow, Fuchsia, Citrus Green and Salmon)

  • Smooth rocks, preferably oval or round in shape

  • Paintbrush

  • Toothpick

  • Outdoor sealer or Patio Paint Clear Coat

Do It Yourself Projects

Do It Yourself Projects
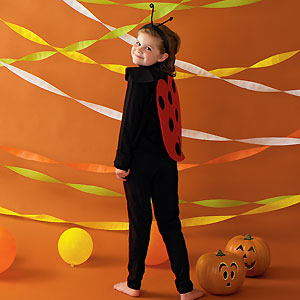
Harvest~Autumn Costume

LadyBug Directions

Ladybugs are the one crawly creature most kids find fun, cute and friendly. Any child will feel the same wearing this simple, comfortable costume.

Materials Needed:

2 pieces (12 x 18 inches) stiff red felt
1 piece (12 x 18 inches) black felt
2 hook-and-loop stick-on buttons
2 large black chenille pipe cleaners
1 regular black pipe cleaner
1 square (12 inches) stick-on black felt
1 black headband
1 black turtleneck top
1 pair black leggings


Step 1

To make the ladybug's wings, draw a semicircle on each piece of stiff red felt. You can attach a 12-inch piece of string to a pencil and, holding the string end midway on the 18-inch side of the felt, draw a semicircle by swinging the pencil in an arc. Curve the top of each wing as shown at right.

Step 2

To make the yoke, fold the black felt piece in half lengthwise. At the center of the folded edge, cut a 5-inch, curved neck opening. Curve the outer edges of the yoke and cut the center open as shown in the photo.

Step 3

Attach the top of the wings to the back of the yoke with glue or needle and thread. Add hook-and-loop buttons to either side of the yoke opening. Sew or glue the large chenille pipe cleaners to the outside joints between the yoke and the wings: these are the bug's extra legs.

Step 4

Use a glass to trace 7 black dots on the stick-on black felt. Cut out the dots and stick them to the ladybug wings as shown in the photo.

Step 5

Glue the center of the regular black pipe cleaner to the center of the headband. Reinforce it with a strip of black stick-on felt. Curl ends of pipe cleaner to complete the antennae.

Step 6

Dress the child in the black turtleneck, leggings, wings with yoke and headband.


Cute Harvest Costume

Cute Harvest Costume
Click on photo for directions

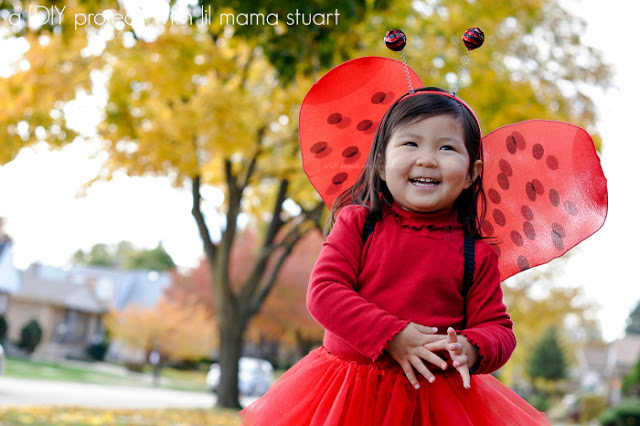
LADYBUG PHOTO'S

LADYBUG PHOTO'S

LadyBug Recipe Today

LadyBug Recipe Today
I love to search, find, share recipes to cook,bake and serve.