Hello

Hello
A magical place

Thursday, August 31, 2017

Fall Bulbs: Planting for Spring Flowers

Fall Bulbs: Planting for Spring Flowers

How and When to Plant Fall Bulbs

Pink Tulips  https://www.almanac.com/content/fall-bulbs-planting-spring-flowers?trk_msg=VU1VQST97HC4B36SI7NBUQGJ2S&trk_contact=EEBLFVJ2I0VAQT9EM5JFVJAK9O&trk_sid=0Q018PF24JEPI1ER5LT0LSC7PC&utm_source=Listrak&utm_medium=Email&utm_term=Fall%20Flower%20Bulbs%3A%20Planting%20for%20Spring%20Blooms%20%28title%29&utm_campaign=Companion%20Daily
Growing the best spring flowers means planting bulbs in the fall! See our handy fall-planted bulbs chart for tips on planting bulbs in autumn.
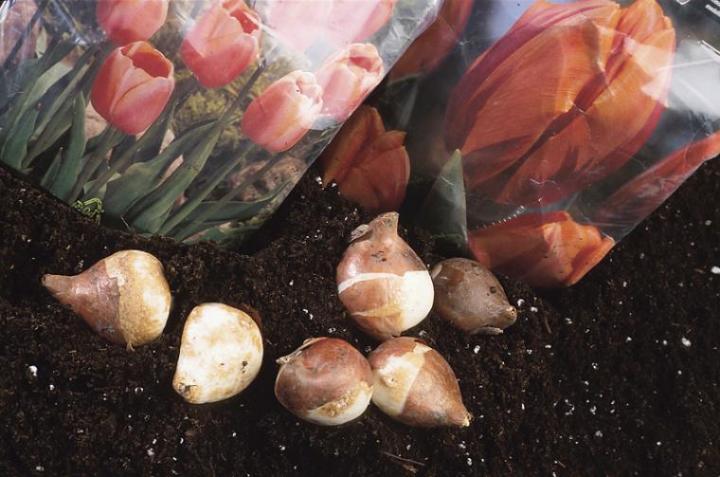
Fall bulbs, such as tulips and daffodils, produce the first blooms of next year’s season. The bulbs spend the winter making roots and come up early in the spring.
So, if you think that autumn’s the time to stop gardening, think again! There still a lot of work to be done—right now, it’s bulb-planting time!

Fall-Planted Flower Bulbs

In the fall, you’ll find bulbs to purchase everywhere. Make sure you buy your bulbs from a reputable nursery, garden center, or mail-order seed catalog. Remember, second-rate bulbs produce second-rate flowers or don’t sprout at all. Here are some of the most popular fall-planted bulbs, which all produce lovely spring flowers. See the chart farther down the page for planting information on these and other spring flower favorites.
Flower bulbs

When to Plant Bulbs:

  • Plant fall bulbs after the heat of summer has passed, but before the ground freezes. Consult our Frost Dates Calculator to see when the first fall frost will be in your area. In the lower South, where you may not have a hard freeze, early November is a good time to plant.
  • Ideally, plant your bulbs soon after you purchase them.
  • See the chart, below, for type of bulbs by hardiness zone. In the warmer South, note that some bulbs need to be treated as annuals instead of perennials; they’ll bloom once and then they’re done. For example, you will have to plant tulip bulbs again each year. Still, they are a beautiful sight to behold and well worth the effort! Other fall bulbs, such as daffodils, will act as perennials and come up year after year.

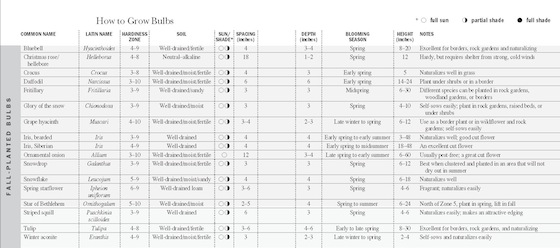
Fall Bulbs Planting Chart

Click to enlarge the Bulbs Growing Chart below!

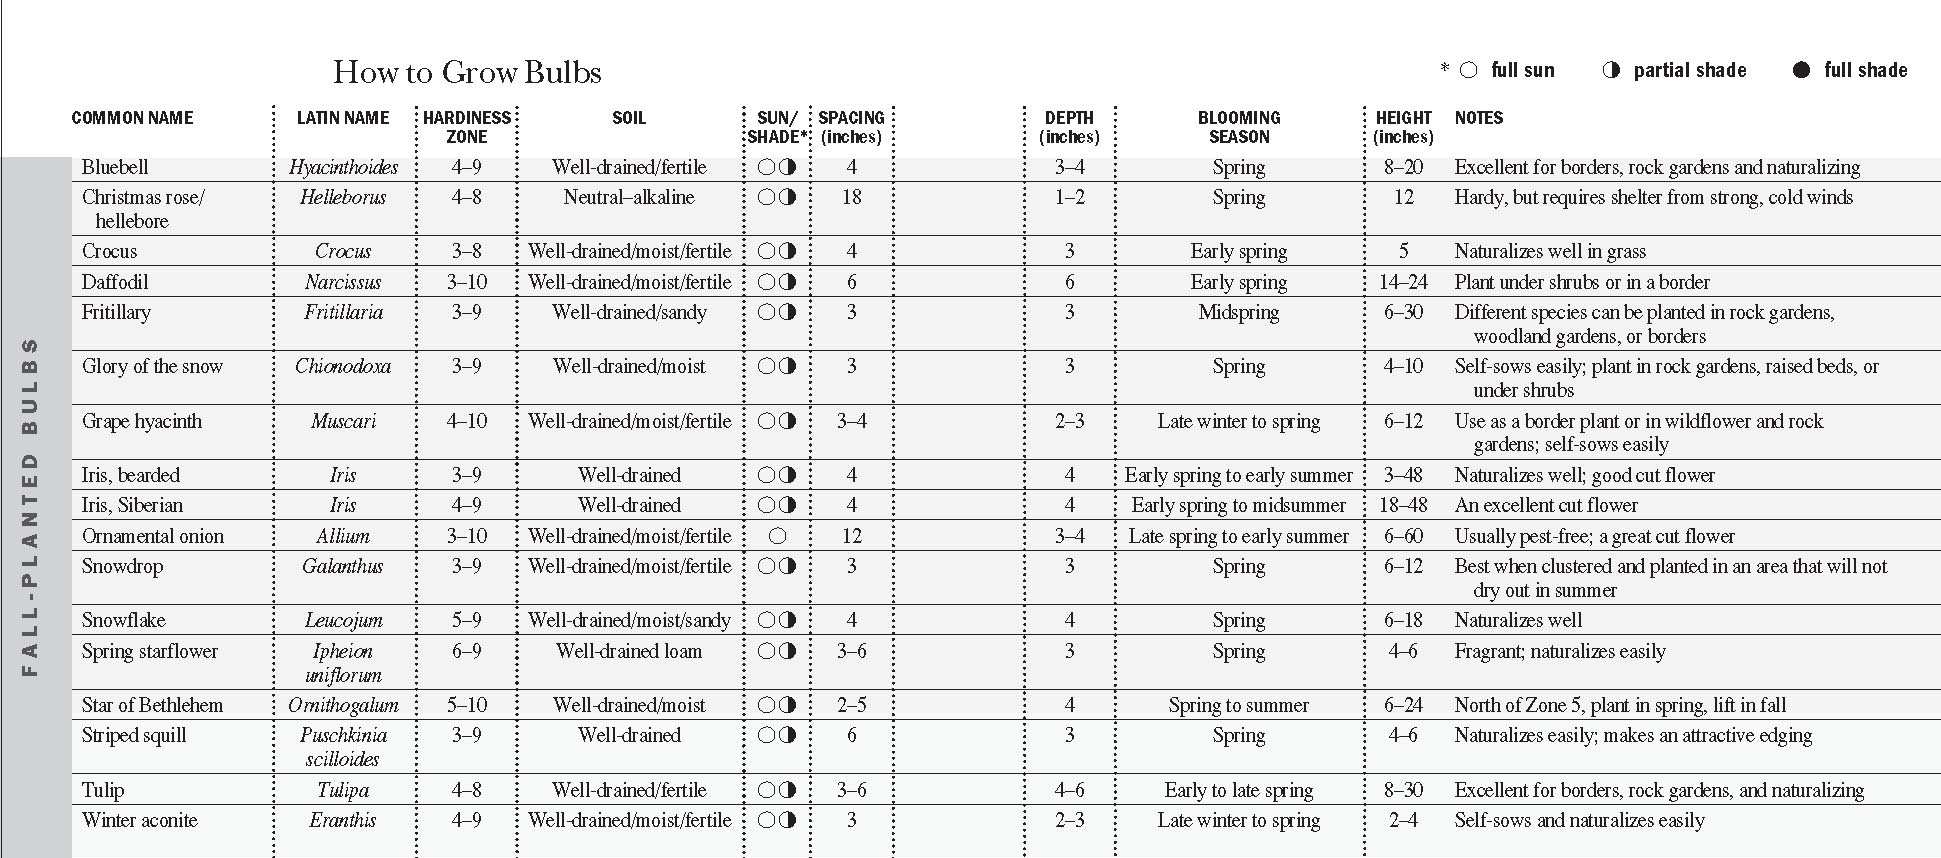
Fall-Planted Bulbs Growing Chart

How to Plant Bulbs:

  • Select a site with lots of sun and well-drained soil. Work a few inches of compost into the soil before planting.
  • Plant bulbs generously in case some do not sprout. And plant them in random order and spacing for a more natural appearance. If you love groves of daffodils and blanketed landscapes of tulips, be prepared to buy and plant a large quantity of bulbs!
  • In general, plant bulbs at a depth of three times the width of the bulb.
  • After planting, apply fertilizer low in nitrogen, such as a 9-6-6 formulation. If your soil is sandy, plant bulbs slightly deeper; in clay soils, slightly shallower.
  • Water well after planting. Apply mulch to keep the weeds down and hold in moisture.
  • Do you have voles or squirrels? Consider planting your bulbs in a “cage” fashioned with chicken wire. Also, check out our tips for preventing vole damage and squirrel damage. Or try planting some rodent-proof bulbs.
Now that you’ve mastered the art of the fall bulb, check out our page on how to grow spring-planted bulbs!

Wednesday, August 23, 2017

Planting Garlic in the Fall

Planting Garlic in the Fall

How and When to Plant Garlic

Garlic Bulbs Garlic is incredibly useful in the kitchen and surprisingly easy to grow in the garden. Learn how and when to plant garlic so that you can maximize your harvest!

When to Plant garlic

Fall is traditionally the best time to plant garlic in many regions. Just like onions and other plants in the Allium family, garlic is sensitive to daylength and matures during the longest days of summer. Fall planting gives it a jumpstart on the growing season and it will be one of the first things to come up in the garden next spring. https://www.almanac.com/blog/gardening/garden-journal/planting-garlic-fall?trk_msg=RK2HGTL3KVG4VBL7MA5HIKCP0K&trk_contact=EEBLFVJ2I0VAQT9EM5JFVJAK9O&trk_sid=BUTPK6FJOT7T1VB1LDKEIEH6D0&utm_source=Listrak&utm_medium=Email&utm_term=Planting+Garlic+in+the+Fall+(title)&utm_campaign=Companion+Daily

Tuesday, August 22, 2017

Delphiniums

Delphiniums

How to Plant, Grow, and Care for Delphinium Flowers

Delphinium Blue 
Delphiniums are perennials grown for their showy spikes of colorful summer flowers in gorgeous shades of blue, pink, white, and purple. They are popular in cottage-style gardens and cutting gardens.
Delphiniums are a favorite of many gardeners, but can sometimes be a challenge. They prefer moist, cool summers and do not fare well in hot, dry weather. The plants also dislike sudden wind or rain.
Except for the dwarf perennials, most delphiniums need staking.

Planting

  • Grow in fertile, well-drained soil in full sun to light shade, with shelter from strong winds.
  • Plant in the spring. Prepare the soil, mixing in 2 to 4 inches of compost.
  • Delphinium is a genus consisting of over 300 species—some are annuals, others are biennials or perennials. Some grow easily from seed, others don’t.
  • Dig a hole twice the diameter of the plant’s container. When planting, ensure that the top of the root ball is level with the soil.
  • In the spring, broadcast lime, wood ashes, or a mixture of the two over this alkaline-loving perennial. Learn more about soil amendments.

Care

  • Insert supports no later than midspring or when the plants reach 12 inches high. Stake the low-growing perennials with twiggy, brushwood support. The taller, large-flowered delphiniums need sturdy stakes.
  • Soil should not dry out. Water plants during the summer if rainfall is less than 1 inch per week.
  • For good-quality flower spikes, thin shoots when 3 inches high; leave a minimum of 2 or 3 shoots on young plants, and 5 to 7 shoots on well-established ones.
  • In growth, water all plants freely, applying a balanced liquid fertilizer every 2 to 3 weeks.
  • Deadhead by cutting spent flower spikes back to small, flowering side shoots.
  • After delphiniums have finished blooming, cut flower stalks to the ground, and new, though smaller, flower stalks will develop. The flowers will survive the coming cold days and even light frosts. (See local frost dates.)
  • If delphiniums need to be divided in the spring, remove and replant the new little plants growing around the outside of the clump. Discard the hard old heart.

Pests/Diseases

  • Susceptible to slugs and snails as well as cyclamen mites.
  • Powdery mildew, Southern blight, bacterial and fungal spots, gray mold, crown and root rot, white rot, rust, white smut, leaf smut, and damping off occur.

Harvest/Storage

  • This elegant flower is good for a cutting garden. If you take the blooms into the house as soon as they open, they will bloom again.
  • Add sugar plus lemon juice and bleach to arrangements of delphinium. You can also use a commercial flower preservative.

Recommended Varieties

Wit & Wisdom

  • Very young delphinium plants and delphinium seeds are poisonous. If ingested, they can cause nausea, twitching muscles, paralysis, and even death.
https://www.almanac.com/plant/delphiniums?trk_msg=OQB9MSIKJ2CKV2OOOF6UU6QALO&trk_contact=EEBLFVJ2I0VAQT9EM5JFVJAK9O&trk_sid=EROGI2KJHRKSKI10SLNH2KKU98&utm_source=Listrak&utm_medium=Email&utm_term=Delphiniums+(title)&utm_campaign=Companion+Daily

Monday, August 14, 2017

Cantaloupe

Cantaloupe

Planting, Growing, and Harvesting Cantaloupe

Sliced Cantaloupe 
Cantaloupes—or muskmelons—are a delicious, heat-loving fruit with a relatively long growing season, making them especially well-suited for southern gardeners. Here’s how to grow cantaloupes in your garden!
What is commonly referred to as a ‘cantaloupe’ is not actually a true cantaloupe—rather, a type of muskmelon. (True cantaloupe has a rough, warty rind and is not widely grown or commercially available in the US.) Their cultural and growing requirements are very similar to other melons and they have a net-like, tan rind, with sweet orange flesh. The names muskmelon and cantaloupe are used interchangeably. We will use the name cantaloupe on this page to avoid confusion.

Planting

  • Amend soil with aged manure or compost before planting. (Learn more about soil amendments and preparing soil for planting.)
  • Growing the vines in raised rows, known as hills, ensures good drainage and will hold the sun’s heat longer.
  • If you are in a cooler zone, start seeds indoors about a month before transplanting. Cantaloupe vines are very tender and should not be transplanted until all danger of frost has passed.
  • If you live in warmer climes, you can direct sow seeds outdoors, but wait until the soil temperature warms to at least 65 degrees to avoid poor germination. Plant seeds one inch deep, 18 inches apart, in hills about 3 feet apart.
  • If you have limited space, vines can be trained to a support, such as a trellis.

Care

  • Cantaloupe likes loamy, well-drained soil. Handle them gently when you transplant. Add lots of compost to the area before planting and after planting.
  • Mulching with black plastic will serve multiple purposes: it will warm the soil, hinder weed growth, and keep developing fruits clean.
  • Fertilize when vines start growing.
  • Row covers are a good way to keep pests at bay.
  • While melon plants are growing, blooming, and setting fruit, they need 1 to 2 inches of water per week. Water in the morning, and try to avoid wetting the leaves. Reduce watering once fruit are growing. Dry weather produces the sweetest melon.
  • If you’ve had an exceptional amount of rainfall during the ripening stage, this could cause bland fruit.
  • Once fruit begins to grow, prune end buds off vines. Your plants may produce fewer melons, but they will be larger and of better quality.
  • Vines produce male and female flowers separately on the same plant. They often begin producing male flowers several weeks before the females appear. (Don’t be discouraged when the first blooms do not produce fruit.)
  • Blossoms require pollination to set fruit, so be kind to the bees!

Pests/Diseases

Harvest/Storage

  • When rinds begin to change from green to tan or yellow, the melon is probably ripe, but be careful not to pick too early.
  • Look for a crack in the stem where it attaches to the fruit. This is a sign of ripeness as well. The fruit should be easy to separate from the vine, but if they fall off by themselves they are usually overripe.
  • Harvest melon when vines are dry, and be careful not to damage them.
  • They will soften after harvesting, but will not continue to sweeten off the vine.
  • Cantaloupe can be stored uncut for 5 or 6 days. If cut, they can last in the refrigerator for about 3 days, wrapped tightly in plastic.

Recommended Varieties

Wit & Wisdom

Cantaloupe was named for Cantalupo, a former papal villa near Rome.
If your muskmelons taste flat, the trouble could be a lack of magnesium in sandy soil. Sweeten the fruit by spraying the vines with this solution: Dissolve 6 ½ tablespoons of Epsom salts and 3 ⅓ tablespoons of borax in 5 gallons of water. Spray the foliage when the vines begin to “run” and again when the fruit is about two inches in diameter.
https://www.almanac.com/plant/cantaloupe?trk_msg=4BBCCCUNLMRKLDVMJ396CP557C&trk_contact=EEBLFVJ2I0VAQT9EM5JFVJAK9O&trk_sid=58UCPNFB2UPCMIMUIV0OQJLGU4&utm_source=Listrak&utm_medium=Email&utm_term=Cantaloupe+(title)&utm_campaign=Companion+Daily

Friday, August 11, 2017

Change Colour Hydrangea Plant Easy Video

Change Color Hydrangea Plant Easy Video

Hydrangeas are a wonderful, old fashioned bush that deliver explosive color. They look absolutely amazing clumped together …

Most hydrangeas thrive in rich, porous, somewhat moist soils. It is advised that you add compost to enrich poor soil. Hydrangeas thrive in full morning sun and they like afternoon shade.
They will still grow and bloom in partial shade. The photo below was found on Bella Wedding Flowers and it’s a great example of the typical hydrangea colors. There are so many choices!

http://thewhoot.com.au/whoot-news/diy/change-colour-of-hydrangeas?omhide=true

Thursday, August 10, 2017

Preserving Herbs

Preserving Herbs

Preserving Herbs
Although I grow many herbs fresh in pots and in my greenhouse for year-round use, I also like to preserve an abundant supply for the long season when nothing grows outdoors. It’s fun and not all that time-consuming.
I think of an “herb” as any aromatic plant used for food, seasoning, or medicine. I’m thinking Greek oregano, basil, rosemary, thyme, dill, parsley, and the various mints, as well as the medicinals: yarrow (leaves and flowers), elderberry flowers, plantain, comfrey, heal-all, and others.
The volatile oils and medicinal phytocompounds are most highly concentrated in leafy herbs as the flower buds swell but haven’t yet opened. Whenever possible, I harvest mine on a sunny morning after the dew has dried, but before the full force of the midday sun.
If you don’t grow or collect your own, you may find fresh herbs in quantity at many farmers’ markets or speciality food stores.
Depending on the intended use, home gardeners have several ways to preserve herbs for cooking and medicine.
I’ve already blogged about making herbal vinegars (“pickling”), tinctures and creams/salves*. Here are a few other methods:
Drying 
The old-fashioned method of tying small bunches of herbs with string and hanging them to dry in a warm, dark place still works well for most leafy herbs and flowers. Rinse the herbs well under cool running water, lay them to wilt and dry in the sun, then tie them up.
To dry a large harvest of tea and medicinal herbs, I’ve had success with stripping individual leaves or flower clusters from their stems, spreading them one layer deep on a thin cotton sheet and tacking the four corners to boards in the steeply pointed ceiling in my attic. It’s hot, dry and dark up there in summer, and the herbs dry quickly. When they crumble easily, I sweep them into a  clean pillow case or heavy paper bag and crush them, then store in glass jars in a dry, dark place.
A few years ago I bought an eight-tray electric food dehydrator to try drying tomatoes, zucchini, and garden fruits. I’ve found it especially useful for drying aromatic culinary and tea herbs: oregano, sage, basil, mint. Because it removes moisture at such a low temperature (about 95°) with continuous airflow across the drying racks, it preserves the rich flavors of these culinary herbs better than oven or air-drying.
When the herbs crumble easily, I sweep them into a large paper bag, crumble them with my hands, and funnel them into glass containers. I like small-mouthed mason jars for storage because they accept the lids from grated parmesan-cheese containers that let me shake herbs right from the jar.
Freezing
Freezing is the best way to maintain the spritely flavors of delicate herbs such as dill, fennel, thyme, basil, and chives (although you can freeze any herb). You have several options for freezing.
  • Chop the well-rinsed herbs (create a mixture if you like), pack them tightly into ice-cube trays, add just enough water to cover, and freeze. You can remove the herb cubes from the trays and store them in a freezer bag or rigid container.
  • Lay sprigs of rinsed herbs one layer deep in a freezer bag and freeze flat. This method allows you to reach into a bag, remove the needed amount of herbs, and crumble them quickly into a salad dressing, soup, or other dish.
  • Make “herbsicles.” Without chopping, pack a handful of fresh leafy herbs in a small plastic snack bag That’s labelled with the herb(s) inside. Roll tightly, seal, then secure with a couple of rubber bands to hold the cylindrical shape. Pack three or four of these frozen logs into a zippered freezer bag. When you want to use one, remove the log from the bag, slice off what you need from one end, and quickly return the log to the freezer.
  • Freeze in olive oil This method makes a perfect way to prepare herbs and herb mixtures for salad dressings, soups, and other prepared dishes. Just blend the desired herbs with enough oil  to make a pourable mixture, pour into ice cube trays and freeze. If you love basil (or any other herb) pesto, puree your big bunches of destemmed basil with olive oil and freeze in ice cube trays. Run the trays under hot water to remove the cubes, pop them into freezer containers or wrap individually in plastic wrap, and store.
  • Of course, the ice-cube method is a perfect way to preserve your pesto, too. A couple of basil-and-garlic pesto cubes will improve the flavor of just about any winter soup.
*Note: Please reserve herb-infused oils to make products for external use only, in creams, salves, lip balms, and/or lotions. Although it’s safe to consume an oil infusion that’s a day or two old (refrigerate after you make it), clostridium botulinum, the bacterium that causes botulism poisoning, can thrive and concentrate in a fresh-herb- or garlic-infused oil intended for dipping or salad dressings, even if it’s been refrigerated.
The commercial oil infusions you find in grocery stores and specialty food markets have been processed with techniques and equipment not available in home kitchens.

About This Blog

"Living Naturally" is all about living a naturally healthy lifestyle. Margaret Boyles covers health tips, ways to avoid illness, natural remedies, food that's good for body and soul, recipes for homemade beauty products, and ideas to make your home a healthy, safe haven. Our goal is also to encourage self-sufficiency, whether it's re-learning some age-old skills or getting informed on modern improvements that help us live better healthier lives.
https://www.almanac.com/blog/natural-health-home-tips/preserving-herbs?trk_msg=39USDOM6POLK9CS1M4P3IH4LQK&trk_contact=EEBLFVJ2I0VAQT9EM5JFVJAK9O&trk_sid=85JVGGOFB7KD8SRQ1NE23NLG9C&utm_source=Listrak&utm_medium=Email&utm_term=Preserving+Herbs+(read+more)&utm_campaign=Companion+Daily

Monday, August 7, 2017

Re-season Your Pots And Pans Like A Pro

Re-season Your Pots And Pans Like A Pro

If you love cooking with cast iron, you need to know the secret to re-seasoning your pots and pans. You will love the results!

How to reseason Cast Iron Pans  http://thewhoot.com.au/whoot-news/diy/reseason-cast-iron-pots?omhide=true

Friday, August 4, 2017

Pickling Tips and Recipes

Pickling Tips and Recipes

How to Pickle and Make Dill Pickles, Pickled Peppers, Dilled Beans, and More!

Pickling tips and recipes-Thinkstock Learn how to pickle! See our best pickling tips—plus, great pickling recipes from dill pickles to pickled peppers! Preserve the bounty of the season’s harvest.

What is Pickling? 

In pickling, the process is about adding acid (vinegar or lemon juice) to a low-acid food to lower its pH to 4.6 or lower.
Acidic foods include all fruits except figs, most tomatoes, fermented and pickled vegetables, relishes, and jams, jellies, and marmalades.

Pickling Tips

  • Produce must be fresh when pickled. Avoid using waxed supermarket produce.
  • Select the most uniform, unspoiled produce.
  • Scrub food well. Be sure to remove and discard ¼–inch slice from the blossom end of fresh cucumbers. Blossoms may contain an enzyme that causes excessive softening of pickles.
  • Use canning or pickling salt (not iodized table salt!). Pickling salt has no additives. Iodized salt makes the brine cloudy and may change the color and texture of the vegetables as well as possibly leave sediment at the bottom of the jars.
  • For the best results, use white distilled or cider vinegar with 5 percent acidity. Use white vinegar when light color is desirable, as with fruits and cauliflower.
  • For crisper pickles, put the vegetables (whole or sliced) into a wide bowl and spread a layer of pickling salt on top. Cover and let sit overnight in a cool place. Discard the liquid, then rinse and dry the vegetables before pickling or canning as usual. The salt helps to pull the moisture out of the vegetables and makes them crisper.
  • Measure or weigh carefully, because the proportion of fresh food to other ingredients will affect flavor and, many times, safety. Here’s how much of each ingredient to use per pound (or tablespoon) of fruit or vegetable:

Pickling Measures

Pickling salt 1 pound = 1–⅓ cup
Granulated sugar 1 pound = 2 cups
Brown sugar 1 pound = 2–¼ to 2–¾ cups, firmly packed
Fresh herbs 1 tablespoon = ½ teaspoon crushed dried herbs
https://www.almanac.com/content/pickling-tips-and-recipes?trk_msg=192V2MKNLA5K977VLN4K1TA1BC&trk_contact=EEBLFVJ2I0VAQT9EM5JFVJAK9O&trk_sid=LMG8GM43HUBLB2ER47JJ3QUO24&utm_source=Listrak&utm_medium=Email&utm_term=Pickling+Tips+and+Recipes+(title)&utm_campaign=Companion+Daily

Wednesday, August 2, 2017

Painted Rock Garden Markers Video Tutorial

Painted Rock Garden Markers Video Tutorial

You will love this collection of Painted Rock Garden Markers and they are very easy to make when you know how …


Asters: Stars of the Fall Garden

Asters: Stars of the Fall Garden

Asters: Stars of the Fall GardenSummer is winding down but the asters are just getting started, adding splashes of lavender, purple, and pink to the fall garden.
A native American plant, the aster got its name from the ancient Greek and Latin words for star, describing its radiant blossom. One of its common names is starwort. As early as 1680, Europeans were importing our native wild asters for use in their Old World gardens. In England today they are called Michaelmas daisies for their habit of blooming around the same time as the Feast of St. Michael on September 29th. They are also the birth flower for September.

The Perfect Fall Perennial

Like many native plants, asters are often overlooked when people plan their flower beds but the reliability of their stunning blossoms during a time of year when other perennials are winding down is something we should be taking advantage of. They not only rescue the fall garden from boredom but also provide nectar for butterflies tanking up before heading south for the winter. They thrive with minimal care and there is a galaxy of starry asters to choose from:
 https://www.almanac.com/blog/gardening/garden-journal/asters-stars-fall-garden?trk_msg=7JBFKM5MQIF476RDAKT5VAAKMK&trk_contact=EEBLFVJ2I0VAQT9EM5JFVJAK9O&trk_sid=6LTP6NBBQMJB8E73A1IABDL2BO&utm_source=Listrak&utm_medium=Email&utm_term=Asters%3a+Stars+of+the+Fall+Garden+(title)&utm_campaign=Companion+Daily

LadyBug Garden Tidbit Of The Month

LadyBug Garden Tidbit Of The Month

St.Lukes Indian Summer~Tidbit Of The Month

http://www.almanac.com/fact/st-lukes-little-summer-lovely-summerlike-days-saint
Lovely, summer like days that occur around October 18 are called Saint Luke’s Little Summer in honor of the saint’s feast day. Around this time, Saint Luke’s feast day, there is a period brief period of calm, dry weather. Of course, it’s difficult to generalize today across the vast continent of North America, but the temperature is usually mild and the leaf colors are turning a gorgeous color. It’s a good time for a brief vacation or visit to a park. In Venice, Italy, they say: “San Luca, El ton va te la zuca” (Pumpkins go stale on St Luke’s Day), but here in North America, pumpkins are enjoying their finest hour. Saint Luke is the patron saint of physicians and surgeons so it seems only fitting that the good doctor give us these calm days. In olden days, St. Luke’s Day did not receive as much attention in the secular world as St. John’s Day (June 24) and Michaelmas (September 29), so it was to keep from being forgotten that St. Luke presented us with some golden days to cherish before the coming of winter, or so the story goes. Some folks call this Indian Summer, but that officially occurs between November 11 and November 20.

When To Plant Mums

When To Plant Mums
Tip of the month

How To Make A Succulent Wreath

How To Make A Succulent Wreath
This turns Out So Pretty! Click on picture for directions

LadyBug Painted Rocks

LadyBug Painted Rocks
For Your Garden

Painted Garden Rocks

Learn to make these adorable ladybug painted rocks. use special outdoor paint for this adorable garden craft so you can keep garden ladybugs…

Ingredients

  • Patio Paint in colors of your choice (I used Larkspur Blue, Petunia Purple, Fiesta Yellow, Fuchsia, Citrus Green and Salmon)

  • Smooth rocks, preferably oval or round in shape

  • Paintbrush

  • Toothpick

  • Outdoor sealer or Patio Paint Clear Coat

Do It Yourself Projects

Do It Yourself Projects
Harvest~Autumn Costume

LadyBug Directions

Ladybugs are the one crawly creature most kids find fun, cute and friendly. Any child will feel the same wearing this simple, comfortable costume.

Materials Needed:

2 pieces (12 x 18 inches) stiff red felt
1 piece (12 x 18 inches) black felt
2 hook-and-loop stick-on buttons
2 large black chenille pipe cleaners
1 regular black pipe cleaner
1 square (12 inches) stick-on black felt
1 black headband
1 black turtleneck top
1 pair black leggings


Step 1

To make the ladybug's wings, draw a semicircle on each piece of stiff red felt. You can attach a 12-inch piece of string to a pencil and, holding the string end midway on the 18-inch side of the felt, draw a semicircle by swinging the pencil in an arc. Curve the top of each wing as shown at right.

Step 2

To make the yoke, fold the black felt piece in half lengthwise. At the center of the folded edge, cut a 5-inch, curved neck opening. Curve the outer edges of the yoke and cut the center open as shown in the photo.

Step 3

Attach the top of the wings to the back of the yoke with glue or needle and thread. Add hook-and-loop buttons to either side of the yoke opening. Sew or glue the large chenille pipe cleaners to the outside joints between the yoke and the wings: these are the bug's extra legs.

Step 4

Use a glass to trace 7 black dots on the stick-on black felt. Cut out the dots and stick them to the ladybug wings as shown in the photo.

Step 5

Glue the center of the regular black pipe cleaner to the center of the headband. Reinforce it with a strip of black stick-on felt. Curl ends of pipe cleaner to complete the antennae.

Step 6

Dress the child in the black turtleneck, leggings, wings with yoke and headband.


Cute Harvest Costume

Cute Harvest Costume
Click on photo for directions

LADYBUG PHOTO'S

LADYBUG PHOTO'S

LadyBug Recipe Today

LadyBug Recipe Today
I love to search, find, share recipes to cook,bake and serve.