Hello

Hello
A magical place

Saturday, February 25, 2017

Easiest Roses to Grow for Beginners

Easiest Roses to Grow for Beginners

Five Unusual Rose Tips that Really Work

  • Plant lavender at the base of rose bushes if deer are a problem in your area. Deer are attracted by rose scent, and lavender muddies the rose aroma.
  • Dump coffee grounds and used tea leaves around bushes. Both acidify the soil slightly, which roses love.
  • Bury banana skins or even the entire black, mushy banana at the base of bushes to provide magnesium, an element plants crave.
  • Scratch two tablespoons of Epsom salts into the soil around a rose. The salts make flower colors more intense.
  • Use rabbit food for fertilizer. The pet food is composed of alfalfa meal, which supplies a growth stimulant, nitrogen and trace elements to roses. Scratch in ½ cup of pellets around each rose and water well.
Read more about landscape roses and disease-resistant roses.

Tuesday, February 21, 2017

10 Gardening Tips for Beginners

10 Gardening Tips for Beginners 

  • start simple,
  • grow what grows in your climate,
  • wait until you have a few seasons under your belt before trying anything exotic,
  • don’t jump ahead of planting time for your area unless you are prepared to cover plants at night and during a cold spell,
  • don’t use seedy hay for mulch, and
  • start a compost pile.
The most important lesson we all have learned is not to let our mistakes stop us. Unlike brain surgery, gardening is something that you can learn by doing.                                                                 

Friday, February 17, 2017

Best Edible Flowers for Growing and Eating

Best Edible Flowers for Growing and Eating

Add flowers to your food! Here are the best edible flowers, based on first-hand experience in the garden and kitchen!
I especially love adding small edible flowers to salads, which can be made even more attractive and special with their color and subtle taste.
Many folks know about nasturtiums.


These happy-faced flowers are among the first to get planted in the spring as they don’t mind some frost. They come in many colors and styles and will continue to blossom as long as they are picked. They don’t have much flavor but always bring smiles to people when they arrive atop beds of lettuce, arugula or spinach.
Marigolds are edible, too. Most of the regular ones are a bit tough and unappetizing, but there is a series called “gems” that are just delightful. Lemon gems are bright yellow while tangerine gems are a lovely orange.


They don’t taste like much, but they have an interesting shape and easily stand up in the bowl.
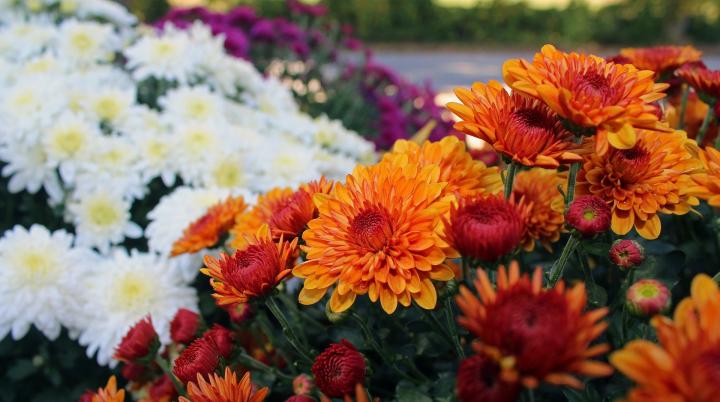
Calendulas are edible as well. These daisy-like flowers come in yellows and oranges with tan and soft pink varieties available.

They can be added to a dish whole or the petals can be pulled and mixed into a salad to brighten it. They are also easy to dry. Pull the petals and put them on a cookie tray.

Leave this in a very dry spot; the top of a warm closet, an attic or an oven with a pilot light. After a couple of days, they can be collected and put in a sealed jar for storage.

Chive flowers can also be added to the list. These are very spicy and might be best utilized pulled apart and used judiciously. They can also be made into chive vinegar. Put the flowers into a clear jar with organic vinegar and leave in the Sun for a couple of weeks. Strain out the buds and keep in a sealed jar in the pantry.
In early spring, violets and small dandelions can be picked and added to salads. The dandelions are particularly delicious when they are underground and just about to emerge. These can be washed carefully and steamed for a few minutes. Serve with salt and butter.
Red and white clovers are edible although usually served in tea. These can be dried in a similar method to the calendulas.
Thyme flowers make great garnishes. They can be artfully placed on plates on top of or around different sides.
Enjoy growing, eating, and garnishing with flowers!

Editors’ note: Celeste’s recommendations assume that you NEVER use pesticides or other chemicals on the flowers you eat. Remember not all flowers are edible.
~ By  Celeste Longacre

About This Blog

Celeste Longacre has been growing virtually all of her family’s vegetables for the entire year for over 30 years. She cans, she freezes, she dries, she ferments & she root cellars. She also has chickens. Celeste has also enjoyed a longtime relationship with The Old Farmer’s Almanac as their astrologer. Her new book, “Celeste’s Garden Delights,” is now available!

5 Super-Early Vegetables to Start in Winter

5 Super-Early Vegetables to Start in Winter Many vegetables can be seeded by late winter to give you a super-early start. Here are 5 vegetables that you can start growing now, and we demonstrate how to get the best return from these early-season crops. After you watch the video, why not take a look at our online Garden Planner? Get a free 7-day trial for Mac or PC—ample time to plan your garden. http://www.almanac.com/video/5-super-early-vegetables-start-winter?trk_msg=SS2BGHANPPQKLCOVHE6JPST5BS&trk_contact=EEBLFVJ2I0VAQT9EM5JFVJAK9O&trk_sid=IRUTCBIT8CRUEKK70K23EN331G&utm_source=Listrak&utm_medium=Email&utm_term=5+Super-Early+Vegetables+to+Start+in+Winter+(title)&utm_campaign=Companion+Daily

Monday, February 6, 2017

The Easiest Seeds to Start

The Easiest Seeds to Start

We've put together our list of the easiest annuals to grow from seed.
 
It's hard not to love a marigold's bright yellow, orange, and red flowers. Happily, this is one of the easiest seeds to grow.
Starting Tips: You can sow marigolds directly into the garden. If you start seeds indoors, sow seed 1/8 inch deep. They usually sprout in less than a week. A charming annual that blooms in shades of blue, pink, and purple, bachelor's button is a great choice for hot, dry sites. The flowers are perfect for cut- and dried-flower bouquets.

Starting Tips: Plant the seed about 1/8 inch deep; they typically sprout in one to three weeks. You can start it early indoors or sow it directly outdoors in the garden. 

LadyBug Garden Tidbit Of The Month

LadyBug Garden Tidbit Of The Month

St.Lukes Indian Summer~Tidbit Of The Month

http://www.almanac.com/fact/st-lukes-little-summer-lovely-summerlike-days-saint
Lovely, summer like days that occur around October 18 are called Saint Luke’s Little Summer in honor of the saint’s feast day. Around this time, Saint Luke’s feast day, there is a period brief period of calm, dry weather. Of course, it’s difficult to generalize today across the vast continent of North America, but the temperature is usually mild and the leaf colors are turning a gorgeous color. It’s a good time for a brief vacation or visit to a park. In Venice, Italy, they say: “San Luca, El ton va te la zuca” (Pumpkins go stale on St Luke’s Day), but here in North America, pumpkins are enjoying their finest hour. Saint Luke is the patron saint of physicians and surgeons so it seems only fitting that the good doctor give us these calm days. In olden days, St. Luke’s Day did not receive as much attention in the secular world as St. John’s Day (June 24) and Michaelmas (September 29), so it was to keep from being forgotten that St. Luke presented us with some golden days to cherish before the coming of winter, or so the story goes. Some folks call this Indian Summer, but that officially occurs between November 11 and November 20.

When To Plant Mums

When To Plant Mums
Tip of the month

How To Make A Succulent Wreath

How To Make A Succulent Wreath
This turns Out So Pretty! Click on picture for directions

LadyBug Painted Rocks

LadyBug Painted Rocks
For Your Garden

Painted Garden Rocks

Learn to make these adorable ladybug painted rocks. use special outdoor paint for this adorable garden craft so you can keep garden ladybugs…

Ingredients

  • Patio Paint in colors of your choice (I used Larkspur Blue, Petunia Purple, Fiesta Yellow, Fuchsia, Citrus Green and Salmon)

  • Smooth rocks, preferably oval or round in shape

  • Paintbrush

  • Toothpick

  • Outdoor sealer or Patio Paint Clear Coat

Do It Yourself Projects

Do It Yourself Projects
Harvest~Autumn Costume

LadyBug Directions

Ladybugs are the one crawly creature most kids find fun, cute and friendly. Any child will feel the same wearing this simple, comfortable costume.

Materials Needed:

2 pieces (12 x 18 inches) stiff red felt
1 piece (12 x 18 inches) black felt
2 hook-and-loop stick-on buttons
2 large black chenille pipe cleaners
1 regular black pipe cleaner
1 square (12 inches) stick-on black felt
1 black headband
1 black turtleneck top
1 pair black leggings


Step 1

To make the ladybug's wings, draw a semicircle on each piece of stiff red felt. You can attach a 12-inch piece of string to a pencil and, holding the string end midway on the 18-inch side of the felt, draw a semicircle by swinging the pencil in an arc. Curve the top of each wing as shown at right.

Step 2

To make the yoke, fold the black felt piece in half lengthwise. At the center of the folded edge, cut a 5-inch, curved neck opening. Curve the outer edges of the yoke and cut the center open as shown in the photo.

Step 3

Attach the top of the wings to the back of the yoke with glue or needle and thread. Add hook-and-loop buttons to either side of the yoke opening. Sew or glue the large chenille pipe cleaners to the outside joints between the yoke and the wings: these are the bug's extra legs.

Step 4

Use a glass to trace 7 black dots on the stick-on black felt. Cut out the dots and stick them to the ladybug wings as shown in the photo.

Step 5

Glue the center of the regular black pipe cleaner to the center of the headband. Reinforce it with a strip of black stick-on felt. Curl ends of pipe cleaner to complete the antennae.

Step 6

Dress the child in the black turtleneck, leggings, wings with yoke and headband.


Cute Harvest Costume

Cute Harvest Costume
Click on photo for directions

LADYBUG PHOTO'S

LADYBUG PHOTO'S

LadyBug Recipe Today

LadyBug Recipe Today
I love to search, find, share recipes to cook,bake and serve.