Hello

Hello
A magical place

Monday, October 30, 2017

How to Get Rid of Bad Smells

How to Get Rid of Bad Smells

Natural Remedies for Bad Odors in the Home

Oct 13, 2017
Lemons 
There are many ways to mask bad smells in your home, but how do you truly get rid of them? Here’s how to get rid of bad smells once and for all!
Neuroscientists say humans can distinguish 10,000 scents, though we don’t have names for a lot of them.
Our sense of smell—the olfactory sense—brings depth and emotional richness to daily life. Think about the feelings and memories that flow when you catch a whiff of fresh-cut grass or lilacs in bloom, bury your face in a sun-dried bed sheet just off the line, or enter the kitchen just as a cinnamon-rich apple pie emerges from the oven.
Our olfactory system also alerts us to potential dangers: spoiled food, rot and decay, harmful molds. Most American homes contain a variety of sprays, plug-ins, stick-ons, scented candles, and other products designed to mask or remove bad odors. However, many people suffer allergic reactions to the fragrances in some of these products, and some air fresheners even contain toxins.
Yet a few inexpensive household essentials you probably have on hand already—vinegar, salt, coffee, baking soda, hydrogen peroxide—will neutralize most noxious odors around your home and in your vehicles.

How to Get Rid of Bad Smells

Saturday, October 28, 2017

Are They Poisonous?

Are They Poisonous?

Spiders are blamed for all kinds of things that turn out to be skin infections or some other bug’s fault. Most don’t even have fangs long enough to break your skin. When they do bite, they're typically harmless. In the U.S., only the black widow and brown recluse have venom strong enough to really hurt you. And their bites are rarely deadly to humans.https://www.webmd.com/skin-problems-and-treatments/ss/slideshow-spider-bites?ecd=wnl_wmh_102717&ctr=wnl-wmh-102717_nsl-ld-stry_1&mb=fjn57TBrIqlXyG%40%40f08MHJAyWFWqf9PL0Prbz5KLjJs%3d

What Do Bites Look Like?

They’re pretty much just like an insect bite. For the most part, you can’t tell a spider bit you just from your symptoms. You’ll get a little bump on your skin. It might get red, itchy, and swell up a bit. It might hurt, but no more than a bee sting and usually not for more than an hour or so. That’s basically it -- unless you're bitten by a venomous spider.

Friday, October 27, 2017

Apple Pull-Apart Bread Recipe

Apple Pull-Apart Bread Recipe

Ingredients

  • 1 package (1/4 ounce) active dry yeast
  • 1 cup warm milk
  • 1/2 cup butter or margarine, melted, divided
  • 1 egg
  • 2/3 cup plus 2 tablespoons sugar, divided
  • 1 teaspoon salt
  • 3 to 3-1/2 cups all-purpose flour
  • 1 medium tart apple, peeled and chopped
  • 1/2 cup finely chopped pecans
  • 1/2 teaspoon ground cinnamon
  • ICING:
  • 1 cup confectioners' sugar
  • 3 to 4-1/2 teaspoons hot water
  • 1/2 teaspoon vanilla extract

Directions

In a mixing bowl, dissolve yeast in milk. Add 2 tablespoons butter, egg, 2 tablespoons sugar, salt and 3 cups flour; beat until smooth. Add enough remaining flour to form a stiff dough. Turn onto a floured surface; knead until smooth and elastic, 6-8 minutes. Place in a greased bowl, turning once to grease top. Cover and let rise in a warm place until doubled, about 1 hour.
Combine apple, pecans, cinnamon and remaining sugar; set aside. Punch dough down; divide in half. Cut each half into 16 pieces. On a lightly floured surface, pat or roll out each piece into a 2-1/2-in. circle. Place 1 teaspoon apple mixture in center of circle; pinch edges together and seal, forming a ball. Dip in remaining butter. In a greased 10-in. tube pan, place 16 balls, seam side down; sprinkle with 1/4 cup apple mixture. Layer remaining balls; sprinkle with remaining apple mixture. Cover and let rise until nearly doubled, about 45 minutes. Bake at 350° for 35-40 minutes or until golden brown. Cool for 10 minutes; remove from pan to a wire rack. Combine icing ingredients; drizzle over bread. Yield: 1 loaf.
Originally published as Apple Pull-Apart Bread in Taste of Home August/September 1998, p39

Nutritional Facts

1 piece: 248 calories, 9g fat (4g saturated fat), 31mg cholesterol, 218mg sodium, 38g carbohydrate (19g sugars, 1g fiber), 4g protein.

Rocky Road Chocolate Cookies

Rocky Road Chocolate Cookies

Author:
Serves: 24
Ingredients
  • 2 (4 ounce) semi-sweet baking chocolate bars
  • 1 cup flour
  • ⅓ cup cocoa powder
  • 1 teaspoon baking powder
  • ¼ teaspoon salt
  • 5 tablespoons butter, room temperature
  • ½ cup brown sugar
  • ½ cup granulated sugar
  • 2 large eggs, room temperature
  • 1 teaspoon vanilla
  • ¾ cup walnut pieces
  • 1 cup mini marshmallows, divided
  • 1 cup milk chocolate bars (about 3 1.5 ounce bars), chopped, divided
Instructions
  1. Melt the semi-sweet chocolate bars in the microwave and let cool.
  2. In a mixing bowl, combine four, cocoa powder, baking powder, and salt together. set aside.
  3. In the bowl of a stand mixer, with the paddle attachment, beat butter and sugars together for 2 minutes. Add the eggs and vanilla and mix until smooth. Add the dry ingredients and mix until combined, scraping the sides as needed.
  4. Use a wooden spoon or a spatula to mix in the walnuts, ½ cup marshmallows, and ½ cup chopped chocolate.
  5. Cover dough and refrigerate at least 2 hours. If chilled longer, let it sit on the counter for 30 minutes before rolling.
  6. Preheat oven to 350 degrees and line baking sheet with parchment paper or silpat mats.
  7. Scoop dough and form into (24) 1½ inch balls. Place 3 inches apart on pan. Bake for 11 minutes and then press 3 marshmallows into the tops of each. Return to oven and cook for 1 more minute. Press in a couple more chocolate chunks and let cool on the pan for 5 minutes. Then move to a cooling rack.

Almond Joy Poke Cake

A moist chocolate cake covered in a gooey coconut mixture and topped with a rich chocolate icing and sliced almonds.
Author:
Ingredients
  • 1 (15.25 oz.) box Devil's Food Cake Mix
  • Ingredients on the box to make cake (eggs, oil, water)
  • 1 (14 oz.) can sweetened condensed milk or 1 (15 oz.) can cream of coconut
  • 2 c. shredded coconut
  • ¾ c. sliced almonds
  • Chocolate Icing
  • 4 Tbl. unsalted butter
  • 4 Tbl. unsweetened cocoa powder
  • 2 c. powdered sugar
  • 1½ tsp. vanilla extract
  • 3 Tbl. milk
Instructions
  1. Prepare cake mix and bake according to package directions for a 9x13-inch cake. When cake is done, while it is still warm, poke holes all over the cake using a toothpick or a fork. Stir together sweetened condensed milk or cream of coconut and the shredded coconut and pour/spread over the warm cake. It will be thick. Allow to cool. Some of the mixture will sink down into the holes in the cake. When cake is cool, make the chocolate icing.
  2. For the Chocolate Icing: Melt butter in a medium sauce pan over medium heat. Stir in the cocoa powder until no lumps remain. Remove from heat and stir in the powdered sugar, vanilla and milk. Stir together until smooth and creamy and immediately pour over the cooled cake. Spread out evenly. Top with sliced almonds and allow icing to harden. I like to refrigerate the cake overnight, so it's nice and firm and easier to cut into slices.

Monday, October 23, 2017

Apple Cheesecake Bars

Apple Cheesecake Bars

Apple Cheesecake bars
Author: 
 
Ingredients
For the Crumb Topping:
  • ½ cup all-purpose flour
  • ½ cup light brown sugar
  • ¼ cup quick-cooking oats
  • ¼ cup unsalted butter, at cool room temperature
For the Shortbread Crust:
  • 1 cup all-purpose flour
  • ¼ cup light brown sugar
  • Pinch of salt
  • ½ cup unsalted butter, at cool room temperature
For the Filling:
  • 8 ounces cream cheese, at room temperature
  • ¼ cup + 1 tablespoon granulated sugar, divided
  • 1 egg
  • ½ teaspoon vanilla extract
  • Pinch salt
  • 2 small apples (any variety), peeled, cored and finely chopped
  • ¼ teaspoon ground cinnamon
  • ⅛ teaspoon ground nutmeg
Instructions
  1. Preheat oven to 350 F. Line an 8-inch square baking pan with aluminum foil or parchment paper, leaving an overhang on all sides. Spray the foil with non-stick cooking spray. but no need to spray the parchment paper, if you are using that.
Make the Crumb Topping:
  1. In a small bowl, stir together the flour, brown sugar and oats. Using a fork, your fingers or a pastry blender, work the butter into the dry ingredients until the mixture becomes crumbly. Refrigerate the topping while you prepare the bars.
Make the Crust:
  1. In a medium bowl, whisk together the flour, brown sugar and salt. Add the butter and, using a pastry blender, cut the butter into the dry ingredients until the mixture resembles wet sand. Turn the mixture into the pan and press into an even layer. Bake for 15 minutes, or until light brown and set. Remove the pan to a wire rack.
Make the Filling: Using an electric mixer on medium speed, beat the cream cheese with ¼ cup of the sugar until it’s well-combined and smooth, scraping the sides of the bowl as needed. Add the egg, vanilla and salt, and beat just until the mixture is uniform. Pour over the crust and smooth into an even layer.
  1. In a small bowl, toss the apples with the remaining 1 tablespoon of sugar, the cinnamon and nutmeg, ensuring that the apples are evenly coated. Distribute the apples evenly over the cream cheese mixture. Sprinkle the crumb topping evenly over the apples.
  2. Bake for 30 to 35 minutes, or until the filling is set and the center does not jiggle. Remove the pan to a wire rack and let the bars cool completely before serving or if desired, cover the pan with plastic wrap and refrigerate for a few hours..I think they are best chilled. The bars can be kept in an airtight container in the refrigerator for up to 4 days.
  3. *If you want to take them up a notch, you could drizzle them with caramel sauce before serving.

Saturday, October 21, 2017

Crochet Stones Will Look Beautiful In Your Home

Crochet Stones Will Look Beautiful In Your Home 

Here’s a lovely idea we know you will be keen to try. The Blogger takes smooth sea stones and covers them with crochet ..

Crochet Covered Stones - free pattern on our site 
These stones will look amazing in your home and they are very easy to recreate! Don’t they look absolutely gorgeous grouped together in a bowl.
They would make a fabulous centerpiece and it’s the perfect way to use up all your left over yarn. They would also make ideal paper weights. Margaret says her instructions are for a stone 5 centimeters in diameter.
Crochet Covered Stones Free Pattern  You can however, adapt the pattern to fit any size. It’s a lovely beginner friendly project and she says that if you can crochet a chain, make a single and double crochet stitch, then you will easily be able to make a crochet cover for a stone.https://thewhoot.com/crochet/urchin-crochet-sea-stones?omhide=true

Friday, October 20, 2017

Pumpkin Pickles

Pumpkin Pickles

Thursday, October 19, 2017

How to Overwinter Your Plants and Garden

How to Overwinter Your Plants and Garden

Overwintering Roses, Geranium, Rosemary, and More Plants


autumn-garden-overwintering-plants 
Learn how to properly overwinter your garden plants to keep them protected from snow, wind, and freezing temperatures. They’ll thank you in the spring!

How to Overwinter Geraniums

Before the first frost (find frost dates for your region here), cut plants back to about 6 to 8 inches. Then lift the plants and cut back the roots. Put the trimmed plants in the smallest pots possible—containers just large enough to fit the roots. Fill the remaining space in the pot with regular potting soil. Keep the plants in the shade for a week and then place them in a sunny spot indoors. When new growth starts, cut off all the old leaves.

How to Overwinter Rosemary

This culinary herb prefers life in a pot and can successfully survive as a houseplant from year to year.
Before a frost in the fall, dig it up, plant it in a pot, and bring it indoors. Place it in a sunny window and keep it evenly watered. Mist the leaves frequently or place the entire plant in the shower and give it a good rinse once a month. The plant may start to look a little tired by March, but it will perk up once you return it to the garden. Dig a hole in the late spring, after all danger of frost has passed, and set the plant back into the soil.
Learn more about overwintering rosemary.

How to Overwinter Roses

Roses need thick insulation to help them stay dormant. For those that are grafted, such as hybrid teas, make sure that their graft unions are covered with soil to insulate them from low temperatures. After a freeze or two, mound 12 inches of soil around the base of the rosebush.
Nongrafted roses, such as rugosas and antiques, don’t need much protection. Just mulch the ground around them with a couple of inches of straw or shredded leaves.https://www.almanac.com/extra/how-overwinter-your-plants-and-garden?trk_msg=31NTUF6B568KBDPBHPRVH8QJH4&trk_contact=EEBLFVJ2I0VAQT9EM5JFVJAK9O&trk_sid=MAMTJLFF28651C3MG9P7RF7NF0&utm_source=Listrak&utm_medium=Email&utm_term=How+to+Overwinter+Your+Plants+and+Garden+(title)&utm_campaign=Companion+Daily

Tuesday, October 17, 2017

How to Make Apple Cider With a Press Making Apple Cider

How to Make Apple Cider With a Press

Making Apple Cider
My friends received an apple cider press for a wedding present long ago. Last week, they threw an Apple Cider Press Party, and what a treat!
Have you ever tasted apple cider fresh from the press (your own or a local cider mill)? WOW! The cider has a pure, refreshing flavor that’s hard to beat.
Frankly, I was never crazy about apple cider before. However, I humbly revise my opinion. The difference between the taste of pasteurized, filtered grocery store cider and homemade cider is remarkable. With the cider press, we’re talking 30 seconds from press to glass.
For the uninitiated (formerly, yours truly), an apple cider press is a machine that essentially grinds up the apples into pulp and then presses the juices out.
In colonial days, it was common for farmers and families to own a barreled cider press (and in those days, the cider was often left to ferment and become an alcoholic “hard” cider). Today, I have a feeling that the old-fashioned cider press is becoming more popular again, perhaps because more people are planting fruit trees.

Here’s how the pressing process works:

  • Start with a wheelbarrow of apple drops (fallen apples). You need a good amount of apples to make cider—about 5 times the volume apples to the volume of juice.
  • The apples need to be as ripe as possible, but it’s fine to use less-than-perfect apples on the ground at any orchard or old apple farm. (Discard any rotten ones, though.) Blast the apples with a hose to wash them off. 

Sunday, October 15, 2017

Best Plants That Purify The Air In Your Home

Best Plants That Purify The Air In Your Home

Learn about the plants that purify the air in your home. We have the Nasa Infographic that contains lots of great information. View it now …

 
There are so many toxins and chemicals swirling around our homes. The good news is you can cleanse the air with certain houseplants.
We have tracked down the Nasa findings in a handy infographic and it has lots of great information that you won’t want to miss.http://thewhoot.com.au/life/plants-purify-air-home?omhide=true

Friday, October 13, 2017

How to Cook Pumpkin

How to Cook Pumpkin

The Easiest Way to Cook Pumpkin

Pumpkin Pile  Here’s how to cook pumpkin the simplest way—plus a selection of delicious pumpkin recipes, from our Blue Ribbon Pumpkin Pie to pumpkin spice pancakes!

How to Cook a Pumpkin

  1. First, scrub the outside of the pumpkin with a vegetable brush to remove any dirt. 
  2. Cut the pumpkin in half and use a spoon to scrape out the fibers and the seeds. A serrated grapefruit spoon works great for this.
  3. Cut the pumpkin halves into smaller pieces, then place them skin side up in a shallow baking dish.
  4. Add water to just cover the bottom of the dish, and cover tightly.
  5. Bake in a 325ºF oven until the pumpkin is fork tender. The time will vary depending on the size of your pieces.
  6. Let it cool, and then either cut off the peel or scoop out the flesh.
Tip: For pumpkins that you’re not cooking right away, keep them cool but not quite as cool as root crops. If you have a coolish bedroom, stashing them under the bed works well (just don’t forget about them). They like a temperature of about 50 to 65ºF. https://www.almanac.com/content/how-cook-pumpkin?trk_msg=29602QAECHJ4JA40G0NGIVNK9S&trk_contact=EEBLFVJ2I0VAQT9EM5JFVJAK9O&trk_sid=61S7IBUV83GR5IO6N6DFPN723S&utm_source=Listrak&utm_medium=Email&utm_term=How+to+Cook+Pumpkin+(title)&utm_campaign=Companion+Daily

Shrubs and Trees for Fall

Fall Garden: Shrubs and Trees for Fall

A Garden to Fall For

George and Becky Lohmiller
Autumn Tree Get those beloved colors of autumn right in your own yard with a beautiful fall garden.
Many gardeners prefer autumn to any other season. The heat and humidity of summer have passed, biting insects are gone, and the leaves of many plants paint the landscape with bold strokes of red, yellow, orange, and purple.
With a little planning, you can create a fall garden that will rival the bright new leaves and flowers of spring gardens.
To choose plants for a fall garden, visit a nursery with paper, pencil, and camera in hand. Take notes and snapshots and ask questions:
  • Does the plant have colorful berries for winter interest?
  • Will it attract birds?
  • How will it look in other seasons?
 https://www.almanac.com/content/fall-garden-shrubs-and-trees-fall?trk_msg=29602QAECHJ4JA40G0NGIVNK9S&trk_contact=EEBLFVJ2I0VAQT9EM5JFVJAK9O&trk_sid=61S7IBUV83GR5IO6N6DFPN723S&utm_source=Listrak&utm_medium=Email&utm_term=Fall+Garden%3a+Shrubs+and+Trees+for+Fall+(title)&utm_campaign=Companion+Daily

Thursday, October 12, 2017

How To Use Epsom Salt Around Your Garden

How To Use Epsom Salt Around Your Garden

You will be amazed at the amount of Epsom Salt Garden Uses that there are and Roses are just one of many that we have found ..

 
How would you like to improve your Roses by growing big beautiful flowers that were healthy and brighter?
Well, now you can, and all the while using a very inexpensive, common household ingredient. We are talking about Epsom Salt. 
http://thewhoot.com.au/whoot-news/diy/epsom-salt-for-gardens?omhide=true

Browned Butter Frosted Pumpkin Bars

Browned Butter Frosted Pumpkin Bars

Preparing Your Garden for Winter

Preparing Your Garden for Winter

Overwintering Plants & Other Fall Gardening Tasks

Wheelbarrow Leaf Clean-up  See our list of fall chores to prepare your garden for winter—and ensure a beautiful and vibrant spring! We’ve covered vegetables, herbs, berries, perennials, roses, trees, and shrubs.

Preparing Your Vegetable Garden for Winter

You can postpone the inevitable (that is, winter) for a while by covering your vegetables with old sheets or bedspreads on cold nights, but the declining light and chilly daytime temperatures will naturally bring plant growth to a halt. Get tips for protecting your garden from frost.
Leave carrots, garlic, horseradish, leeks, parsnips, radishes, and turnips in the garden for harvesting through early winter. Mark the rows with tall stakes so that you can find them in snow, and cover them with a heavy layer of mulch to keep the ground from thawing.

What Leaves, Squirrels, Apples and Flowers Predict about Winter

Weather Folklore: What Leaves, Squirrels, Apples and Flowers Predict about Winter

Oct 10, 2017
Onion Skins  I sometimes wonder why I am in the climate business. According to folklore, those leaves you have to rake up will tell you all you need to know about winter.
Are your chrysanthemums really pretty? Get out the mittens.
The birds and bees are not only into sex; apparently, they are weather forecasters as well.
The competition for my job is horrendous.
Here is a sample of rodent wisdom:
Squirrels gathering nuts in a flurry,
Will cause snow to gather in a hurry.

In addition, a tough winter is ahead if squirrels’ tails are very bushy. (Are you polishing the snow shovel yet?)
 https://www.almanac.com/blog/weather/weather-whisperers/weather-folklore-what-leaves-squirrels-apples-and-flowers-predict?trk_msg=KIB1GMFTKV5K94C4G06KV4N1HC&trk_contact=EEBLFVJ2I0VAQT9EM5JFVJAK9O&trk_sid=CCACS49RDRI5R357108JLCRIA8&utm_source=Listrak&utm_medium=Email&utm_term=Weather+Folklore%3a+What+Leaves%2c+Squirrels%2c+Apples+and+Flowers+Predict+about+Winter+(title)&utm_campaign=Companion+Daily

Wednesday, October 11, 2017

The Value of Leaves

The Value of Leaves
Foliage season is a mixed blessing. I have one eye on the gorgeous spectacle of changing colors and the other eye on the value of these leaves—and how I can put them to work.

Leaves that were just beginning to show some color yesterday will soon be brown and on the ground, their brief moment of glory gone. Here's how to use those fall leaves to feed your soil instead of sending them to a landfill.

Free Soil Amendment
Look at all those leaves as brown gold. The leaves of one large tree can be worth as much as $50 worth of plant food and humus. They are a rich source of calcium, magnesium, phosphorus, potassium, and trace minerals the tree roots have mined from deep in the subsoil. Pound for pound, leaves contain twice the mineral content of manure. The huge amount of organic matter they offer can be used to improve soil structure. Leaf humus can lighten heavy clay soils and increase the moisture retention of dry sandy soils. No organic gardener should pass up this opportunity for a free soil amendment.
Composting Leaves
If you are not already composting, now is a good time to start. Rake or blow your leaves into loose piles or enclose them in bins, if you wish.

If you want to speed up decomposition, mow over the leaves a few times with your lawn mower or shred them into smaller pieces with a leaf shredder or chipper. Many leaf vacs have a shredder in them to reduce the volume of the leaves being inhaled. Mix a shovelful of soil in each layer of leaves to introduce helpful microorganisms to the pile. Leaves are high in carbon but low in nitrogen so it helps to add a source of nitrogen like manure or grass clippings to help feed the bacteria that will be doing all the work of breaking down the leaves. Spent plants from the garden that were not diseased or infested with insects can be added to the pile along with kitchen scraps. 
 
LEARN MORE: ECHO's National Sales Event—Big fall savings with instant rebates
 
Making Mulch
Shredded leaves also make a good mulch. Just blow them into your flower beds and under trees and shrubs while mowing. I use a lightweight no-noise leaf blower for my chores now; it’s just so much quicker.

We cover the beds in our vegetable garden with a layer of chopped leaves to keep the soil from washing away over the winter. The best time to mulch perennials is after the ground has frozen, so put aside another pile of shredded leaves to use later in the fall.

Improve the Soil
Don’t want to rake or blow your leaves at all? Researchers at Michigan State University have proven that mowing leaves on your lawn improves the soil, lessening the need for fertilizer in the spring. They recommend setting your mower blade 3 inches high and mowing once a week while the leaves are falling.

As long as you don't have excessive leaf cover, do not be concerned. Mowed leaves feed worms, fungi, and soil bacteria. Don't be a perfectionist or fret if you don’t pick up every single leaf!

Friday, October 6, 2017

Pickled Peppers

Pickled Peppers

Wednesday, October 4, 2017

How to Care for Perennial Flowers

How to Care for Perennial Flowers

Perennial Plants Care Guide

Perennial Garden FlowersPerennial flowers are the way to go! They return year after year, bringing color to the garden. Once established, they require little maintenance. Here are perennial plant care tips!

When to Plant Perennials

Perennial flowers are best planted in the spring or the fall. When selecting perennials, be sure to consider your planting zone and whether your garden is shady or sunny. Also think about when the perennials bloom so that you can select plants that keep the color blooming throughout the growing season. See a perennial garden design.https://www.almanac.com/content/how-care-perennial-flowers?trk_msg=OMBK26D7BLQ4798LC9RRDT9848&trk_contact=EEBLFVJ2I0VAQT9EM5JFVJAK9O&trk_sid=K2ACC77563HRN5FAOB6RJDMGR0&utm_source=Listrak&utm_medium=Email&utm_term=How+to+Care+for+Perennial+Flowers+(title)&utm_campaign=Companion+Daily

Tuesday, October 3, 2017

Protecting Your Garden From Frost

Protecting Your Garden From Frost

Protection Tips and Temperature Chart

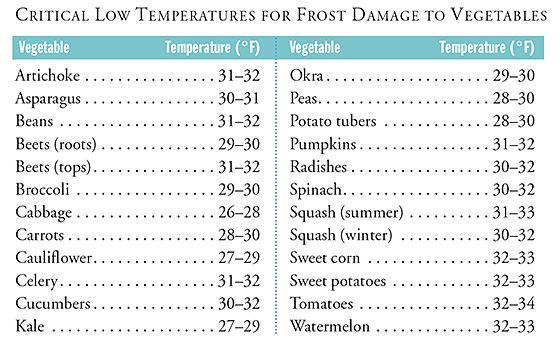
Protecting Garden from Frost  Here are tips on how to protect your garden from frost and design a garden to reduce frost damage—plus, a handy chart listing dangerous temperature lows for vegetables.
To know when your area gets frost, see our U.S. Frost Dates Calculator and the Canadian Frost Dates.

If Frosty Nights Are Forecasted

If temperatures below 32 degrees F are predicted, protect your plants! A moderate freeze with temperatures in the 25- to 28-degree Fahrenheit range can be widely destructive to vegetation.
Frost protection is especially important for tender plants such as geraniums, begonias, impatiens, peppers, and tomatoes.
  • Use row covers if you have tender vegetable seedlings and transplants.
  • Cover other plants with frost cloths or other insulators including newspapers, straw, old sheets and bedspreads, or evergreen branches. Cover the whole plant; you’re trying to retain radiated heat.
  • It’s best to have all covers in place well before sunset. Drape loosely to allow for air circulation. Before you cover the plants in late afternoon or early evening, water your plants lightly. 
  • The plants should be mulched, but pull the mulch back from the root of the plants.
  • Remove the covers by mid-morning.
  • In the fall, the first frost is often followed by a prolonged period of frost-free weather. Cover tender flowers and vegetables on frosty nights, and you may be able to enjoy extra weeks of gardening.
  • In late fall, spread a heavy layer of newspaper (topped off by fall leaves) over a portion of a carrot, parsnip, beet, or rutabaga row to allow these root crops to overwinter in the soil without freezing.

What Temperatures Cause Frost Damage?


Designing Your Garden to Reduce Frost

Here are different ways through which you can reduce the amount of cooling in and around your garden.
  • Your garden will warm up more during the day if it slopes toward the Sun. Residual heat in plants and soil may determine whether your garden sustains frost damage during the night. Cold air, which is dense and heavy, will flow away from plants growing on a slope—what the experts call “drainage.” 
  • A garden on a south-facing slope offers two advantages: more exposure to the Sun, and better drainage of cold air. In deep valleys, nighttime temperatures may be as much as 18°F lower than the temperature on the surrounding hills.
  • Trees surrounding your garden act like a blanket and reduce the amount of heat radiating from the soil, perhaps keeping the temperature high enough to protect your plants from early fall frosts.
  • A stone wall benefits the garden by acting as a heat sink, absorbing warmth from the Sun during the day and radiating it slowly at night. The water in a nearby lake or pond (if it is one acre or larger) does the same. A cold frame can be heated with an improvised heat sink: a dozen 1-gallon jugs of water. They absorb heat during the day and radiate it at night.
  • Moisture also determines whether frost will nip your tomatoes. Condensation warms and evaporation cools. When moisture in the air condenses on plants and soil, heat is produced, sometimes raising the temperature enough to save the plants. On the other hand, if the air is dry, moisture in the soil will evaporate, removing some heat.
  • Good soil, full of organic matter, retains moisture, reducing the rate of evaporation. Mulch also helps to prevent evaporation.
  • Plants themselves can modify cooling. Dark ones with a maroon or bronze cast may absorb more heat during the day. Those that have been planted close together create a canopy that entraps heat from the soil (though the tops can still suffer frost damage). More important, a plant’s cold hardiness determines its ability to withstand colder temperatures.
Design your garden with the Almanac Garden Planner which uses averaged frost data from nearly 5,000 weather stations across the U.S. and Canada. To benefit from this, consider a free 7-day trial to our Almanac Garden Planner!

Predicting Frost

When the sky seems very full of stars, expect frost. –Weather Lore
If it has been a glorious day, with a clear sky and low humidity, chances are that temperatures will drop enough at night to cause frost.
Find out how to predict that a frost is coming!https://www.almanac.com/content/protecting-your-garden-frost?trk_msg=H9I4831K59L4NFQP01UVTBNDF0&trk_contact=EEBLFVJ2I0VAQT9EM5JFVJAK9O&trk_sid=AKP7SUQT7BJ7MD0M959CRUVMUO&utm_source=Listrak&utm_medium=Email&utm_term=Protecting+Your+Garden+From+Frost+(title)&utm_campaign=Companion+Daily

LadyBug Garden Tidbit Of The Month

LadyBug Garden Tidbit Of The Month

St.Lukes Indian Summer~Tidbit Of The Month

http://www.almanac.com/fact/st-lukes-little-summer-lovely-summerlike-days-saint
Lovely, summer like days that occur around October 18 are called Saint Luke’s Little Summer in honor of the saint’s feast day. Around this time, Saint Luke’s feast day, there is a period brief period of calm, dry weather. Of course, it’s difficult to generalize today across the vast continent of North America, but the temperature is usually mild and the leaf colors are turning a gorgeous color. It’s a good time for a brief vacation or visit to a park. In Venice, Italy, they say: “San Luca, El ton va te la zuca” (Pumpkins go stale on St Luke’s Day), but here in North America, pumpkins are enjoying their finest hour. Saint Luke is the patron saint of physicians and surgeons so it seems only fitting that the good doctor give us these calm days. In olden days, St. Luke’s Day did not receive as much attention in the secular world as St. John’s Day (June 24) and Michaelmas (September 29), so it was to keep from being forgotten that St. Luke presented us with some golden days to cherish before the coming of winter, or so the story goes. Some folks call this Indian Summer, but that officially occurs between November 11 and November 20.

When To Plant Mums

When To Plant Mums
Tip of the month

How To Make A Succulent Wreath

How To Make A Succulent Wreath
This turns Out So Pretty! Click on picture for directions

LadyBug Painted Rocks

LadyBug Painted Rocks
For Your Garden

Painted Garden Rocks

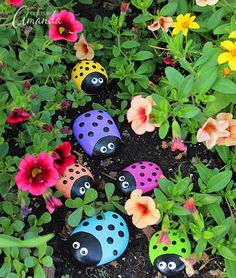
Learn to make these adorable ladybug painted rocks. use special outdoor paint for this adorable garden craft so you can keep garden ladybugs…

Ingredients

  • Patio Paint in colors of your choice (I used Larkspur Blue, Petunia Purple, Fiesta Yellow, Fuchsia, Citrus Green and Salmon)

  • Smooth rocks, preferably oval or round in shape

  • Paintbrush

  • Toothpick

  • Outdoor sealer or Patio Paint Clear Coat

Do It Yourself Projects

Do It Yourself Projects
Harvest~Autumn Costume

LadyBug Directions

Ladybugs are the one crawly creature most kids find fun, cute and friendly. Any child will feel the same wearing this simple, comfortable costume.

Materials Needed:

2 pieces (12 x 18 inches) stiff red felt
1 piece (12 x 18 inches) black felt
2 hook-and-loop stick-on buttons
2 large black chenille pipe cleaners
1 regular black pipe cleaner
1 square (12 inches) stick-on black felt
1 black headband
1 black turtleneck top
1 pair black leggings


Step 1

To make the ladybug's wings, draw a semicircle on each piece of stiff red felt. You can attach a 12-inch piece of string to a pencil and, holding the string end midway on the 18-inch side of the felt, draw a semicircle by swinging the pencil in an arc. Curve the top of each wing as shown at right.

Step 2

To make the yoke, fold the black felt piece in half lengthwise. At the center of the folded edge, cut a 5-inch, curved neck opening. Curve the outer edges of the yoke and cut the center open as shown in the photo.

Step 3

Attach the top of the wings to the back of the yoke with glue or needle and thread. Add hook-and-loop buttons to either side of the yoke opening. Sew or glue the large chenille pipe cleaners to the outside joints between the yoke and the wings: these are the bug's extra legs.

Step 4

Use a glass to trace 7 black dots on the stick-on black felt. Cut out the dots and stick them to the ladybug wings as shown in the photo.

Step 5

Glue the center of the regular black pipe cleaner to the center of the headband. Reinforce it with a strip of black stick-on felt. Curl ends of pipe cleaner to complete the antennae.

Step 6

Dress the child in the black turtleneck, leggings, wings with yoke and headband.


Cute Harvest Costume

Cute Harvest Costume
Click on photo for directions

LADYBUG PHOTO'S

LADYBUG PHOTO'S

LadyBug Recipe Today

LadyBug Recipe Today
I love to search, find, share recipes to cook,bake and serve.