3/4 cup chopped sweetened dried cranberries (optional)
Instructions
Heat oven to 350ºF.
In a bowl, combine flour, sugar, baking powder, cinnamon, baking
soda, and ginger. Stir in pumpkin, butter, and eggs; mix well. Stir in
cranberries (if using).
Spread batter into ungreased 15x10x1-inch jelly-roll pan. Bake for 20
to 25 minutes, or until toothpick inserted into the center comes out
clean. Cool completely.
Frosting
Ingredients
1/2 cup (1 stick) salted butter
4 cups confectioners' sugar
1 teaspoon vanilla extract
1/4 to 1/3 cup milk
Instructions
In
a 1-quart saucepan over medium heat, melt butter, stirring constantly
and watching closely, until butter just starts to turn golden brown (3
to 5 minutes). Immediately remove from heat. Pour into a bowl and cool
for 5 minutes. Add sugar and vanilla to cooled browned butter and mix
well. Stir in enough milk for desired frosting consistency.
Spread frosting over cooled bars. Cut into bars.
See our list of fall chores to prepare your garden for winter—andensure a beautiful and vibrant spring! We’ve covered vegetables, herbs, berries, perennials, roses, trees, and shrubs.
Preparing Your Vegetable Garden for Winter
You can postpone the inevitable (that is, winter) for a while by
covering your vegetables with old sheets or bedspreads on cold nights,
but the declining light and chilly daytime temperatures will naturally
bring plant growth to a halt. Get tips for protecting your garden from frost.
Leave carrots, garlic, horseradish, leeks, parsnips, radishes, and turnips
in the garden for harvesting through early winter. Mark the rows with
tall stakes so that you can find them in snow, and cover them with a
heavy layer of mulch to keep the ground from thawing.
Pull up tomato, squash, pea, and bean
plants. If they’re disease-free, compost them. If any are diseased,
either burn them or discard separately. Pull up and put away the stakes.
Before the ground gets too hard, remove all weeds and debris and
eliminate overwintering sites for insects and disease. Check our Pest Library for tips on preventing the most common pests in your garden.
Gently till the soil to expose any insects who plan to overwinter;
this will reduce pest troubles in the spring and summer. This is one of
the most effective ways to reduce populations of Japanese beetles, whose grubs live and overwinter in the ground.
Once most of the garden soil is exposed, add a layer of compost, leaves, manure (if you have it), and lime (if you need it). Gently till into the soil.
Foliage
season is a mixed blessing. I have one eye on the gorgeous spectacle of
changing colors and the other eye on the value of these leaves—and how I
can put them to work.
Leaves that were just beginning to show some color yesterday will soon
be brown and on the ground, their brief moment of glory gone. Here's how
to use those fall leaves to feed your soil instead of sending them to a
landfill.
Free Soil Amendment Look at all those leaves as brown gold. The
leaves of one large tree can be worth as much as $50 worth of plant
food and humus. They are a rich source of calcium, magnesium,
phosphorus, potassium, and trace minerals the tree roots have mined from
deep in the subsoil. Pound for pound, leaves contain twice the mineral
content of manure. The huge amount of organic matter they offer can be
used to improve soil structure. Leaf humus can lighten heavy clay soils
and increase the moisture retention of dry sandy soils. No organic
gardener should pass up this opportunity for a free soil amendment.
Composting Leaves
If you are not already composting, now is a good time to start. Rake or blow your leaves into loose piles or enclose them in bins, if you wish.
If you want to speed up decomposition, mow over the leaves a few times
with your lawn mower or shred them into smaller pieces with a leaf
shredder or chipper. Many leaf vacs have a shredder in them to reduce
the volume of the leaves being inhaled. Mix a shovelful of soil in each
layer of leaves to introduce helpful microorganisms to the pile. Leaves
are high in carbon but low in nitrogen so it helps to add a source of
nitrogen like manure or grass clippings to help feed the bacteria that
will be doing all the work of breaking down the leaves. Spent plants
from the garden that were not diseased or infested with insects can be
added to the pile along with kitchen scraps.
LEARN MORE: ECHO's National Sales Event—Big fall savings with instant rebates
Making Mulch
Shredded leaves also make a good mulch. Just blow them into your flower beds and under trees and shrubs while mowing. I use a lightweight no-noise leaf blower for my chores now; it’s just so much quicker.
We cover the beds in our vegetable garden with a layer of chopped leaves
to keep the soil from washing away over the winter. The best time to
mulch perennials is after the ground has frozen, so put aside another
pile of shredded leaves to use later in the fall.
Improve the Soil
Don’t want to rake or blow your leaves at all? Researchers at Michigan
State University have proven that mowing leaves on your lawn improves
the soil, lessening the need for fertilizer in the spring. They
recommend setting your mower blade 3 inches high and mowing once a week
while the leaves are falling.
As long as you don't have excessive leaf cover, do not be concerned.
Mowed leaves feed worms, fungi, and soil bacteria. Don't be a
perfectionist or fret if you don’t pick up every single leaf!
Pickling
peppers is easy! When you only have a few peppers, this Pickled Peppers
recipe will do nicely. Just grab some white vinegar and go!
You can use any kind of pepper. To add a kick, put a whole hot pepper
in the middle. Just make a couple slits to the hot pepper with a knife.
The more slits, the spicier the result. (For less spice, remove
the seeds.)
For more information, see our video on how to make these pickled peppers.
Perennial flowers are the way to go! They return
year after year, bringing color to the garden. Once established, they
require little maintenance. Here are perennial plant care tips!
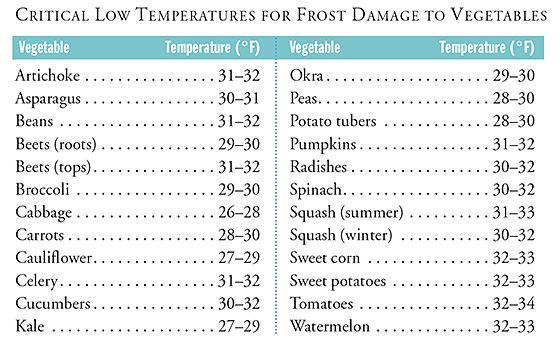
Here are tips on how to protect your garden from frost and design a garden to reduce frost damage—plus, a handy chart listing dangerous temperature lows for vegetables.
To know when your area gets frost, see our U.S. Frost Dates Calculator and the Canadian Frost Dates.
If Frosty Nights Are Forecasted
If temperatures below 32 degrees F are predicted, protect your
plants! A moderate freeze with temperatures in the 25- to 28-degree
Fahrenheit range can be widely destructive to vegetation.
Frost protection is especially important for tender plants such as geraniums, begonias, impatiens, peppers, and tomatoes.
Use row covers if you have tender vegetable seedlings and transplants.
Cover other plants with frost cloths or other insulators
including newspapers, straw, old sheets and bedspreads, or evergreen
branches. Cover the whole plant; you’re trying to retain radiated heat.
It’s best to have all covers in place well before sunset. Drape
loosely to allow for air circulation. Before you cover the plants in
late afternoon or early evening, water your plants lightly.
The plants should be mulched, but pull the mulch back from the root of the plants.
Remove the covers by mid-morning.
In the fall, the first frost is often followed by a prolonged period
of frost-free weather. Cover tender flowers and vegetables on frosty
nights, and you may be able to enjoy extra weeks of gardening.
In late fall, spread a heavy layer of newspaper (topped off by fall leaves) over a portion of a carrot, parsnip, beet, or rutabaga row to allow these root crops to overwinter in the soil without freezing.
What Temperatures Cause Frost Damage?
Designing Your Garden to Reduce Frost
Here are different ways through which you can reduce the amount of cooling in and around your garden.
Your garden will warm up more during the day if it slopes toward
the Sun. Residual heat in plants and soil may determine whether your
garden sustains frost damage during the night. Cold air, which is dense
and heavy, will flow away from plants growing on a slope—what the
experts call “drainage.”
A garden on a south-facing slope offers two advantages: more
exposure to the Sun, and better drainage of cold air. In deep valleys,
nighttime temperatures may be as much as 18°F lower than the temperature
on the surrounding hills.
Trees surrounding your garden act like a blanket and reduce the
amount of heat radiating from the soil, perhaps keeping the temperature
high enough to protect your plants from early fall frosts.
A stone wall benefits the garden by acting as a heat sink, absorbing
warmth from the Sun during the day and radiating it slowly at night.
The water in a nearby lake or pond (if it is one acre or larger) does
the same. A cold frame can be heated with an improvised heat sink: a
dozen 1-gallon jugs of water. They absorb heat during the day and
radiate it at night.
Moisture also determines whether frost will nip your tomatoes.
Condensation warms and evaporation cools. When moisture in the air
condenses on plants and soil, heat is produced, sometimes raising the
temperature enough to save the plants. On the other hand, if the air is
dry, moisture in the soil will evaporate, removing some heat.
Good soil, full of organic matter, retains moisture, reducing the rate of evaporation. Mulch also helps to prevent evaporation.
Plants themselves can modify cooling. Dark ones with a maroon or
bronze cast may absorb more heat during the day. Those that have been
planted close together create a canopy that entraps heat from the soil
(though the tops can still suffer frost damage). More important, a
plant’s cold hardiness determines its ability to withstand
colder temperatures.
Design your garden with the Almanac Garden Planner which uses averaged frost data from nearly 5,000 weather stations across the U.S. and Canada. To benefit from this, consider a free 7-day trial to our Almanac Garden Planner!
http://www.almanac.com/fact/st-lukes-little-summer-lovely-summerlike-days-saint Lovely, summer like days that occur around October 18 are called Saint Luke’s Little Summer in honor of the saint’s feast day. Around this time, Saint Luke’s feast day, there is a period brief period of calm, dry weather. Of course, it’s difficult to generalize today across the vast continent of North America, but the temperature is usually mild and the leaf colors are turning a gorgeous color. It’s a good time for a brief vacation or visit to a park. In Venice, Italy, they say: “San Luca, El ton va te la zuca” (Pumpkins go stale on St Luke’s Day), but here in North America, pumpkins are enjoying their finest hour. Saint Luke is the patron saint of physicians and surgeons so it seems only fitting that the good doctor give us these calm days. In olden days, St. Luke’s Day did not receive as much attention in the secular world as St. John’s Day (June 24) and Michaelmas (September 29), so it was to keep from being forgotten that St. Luke presented us with some golden days to cherish before the coming of winter, or so the story goes. Some folks call this Indian Summer, but that officially occurs between November 11 and November 20.
When To Plant Mums
Tip of the month
How To Make A Succulent Wreath
This turns Out So Pretty! Click on picture for directions
LadyBug Painted Rocks
For Your Garden
Painted Garden Rocks
Learn to make these adorable ladybug painted rocks. use special outdoor paint for this adorable garden craft so you can keep garden ladybugs…
Ingredients
Patio Paint in colors of your choice (I used Larkspur Blue, Petunia Purple, Fiesta Yellow, Fuchsia, Citrus Green and Salmon)
Smooth rocks, preferably oval or round in shape
Paintbrush
Toothpick
Outdoor sealer or Patio Paint Clear Coat
Do It Yourself Projects
Harvest~Autumn Costume
LadyBug Directions
Ladybugs are the one crawly creature most kids find fun, cute and friendly. Any child will feel the same wearing this simple, comfortable costume.
Materials Needed:
2 pieces (12 x 18 inches) stiff red felt 1 piece (12 x 18 inches) black felt 2 hook-and-loop stick-on buttons 2 large black chenille pipe cleaners 1 regular black pipe cleaner 1 square (12 inches) stick-on black felt 1 black headband 1 black turtleneck top 1 pair black leggings
Step 1
To make the ladybug's wings, draw a semicircle on each piece of stiff red felt. You can attach a 12-inch piece of string to a pencil and, holding the string end midway on the 18-inch side of the felt, draw a semicircle by swinging the pencil in an arc. Curve the top of each wing as shown at right.
Step 2
To make the yoke, fold the black felt piece in half lengthwise. At the center of the folded edge, cut a 5-inch, curved neck opening. Curve the outer edges of the yoke and cut the center open as shown in the photo.
Step 3
Attach the top of the wings to the back of the yoke with glue or needle and thread. Add hook-and-loop buttons to either side of the yoke opening. Sew or glue the large chenille pipe cleaners to the outside joints between the yoke and the wings: these are the bug's extra legs.
Step 4
Use a glass to trace 7 black dots on the stick-on black felt. Cut out the dots and stick them to the ladybug wings as shown in the photo.
Step 5
Glue the center of the regular black pipe cleaner to the center of the headband. Reinforce it with a strip of black stick-on felt. Curl ends of pipe cleaner to complete the antennae.
Step 6
Dress the child in the black turtleneck, leggings, wings with yoke and headband.
Cute Harvest Costume
Click on photo for directions
LADYBUG PHOTO'S
LadyBug Recipe Today
I love to search, find, share recipes to cook,bake and serve.