Hello

Hello
A magical place

Tuesday, December 5, 2017

Christmas Cactus

Christmas Cactus

Caring for Christmas Cactus

Christmas Cactus
Christmas Cacti are easy to grow. When they bloom, they produce colorful tubular flowers in pink or lilac colors.  They bloom a long time indoors and they are low-maintenance houseplants, which makes them popular. We’ll bet someone in your family has a Christmas Cactus!
Despite their name, Christmas cacti are not desert cacti.  Their natural habit is one of an epiphyte living in tree branches in the rain forest of Brazil!  In others, they prefer a humid climate, not a dry one. It’s important to water these cacti! (See more detail below.)
Also, note that there are several types of Holiday Cacti:  Easter, Thanksgiving and Christmas. They bloom closest to the holiday of their name. Christmas cacti have flattened leaves with rounded teeth on the margins as opposed to the Thanksgiving cactus that has pointed teeth. Easter cacti have pointed teeth with fibrous hairs in the leaf joints.
To confuse matters further, most of the Christmas cactus sold are actually Thanksgiving cactus. If you find your Christmas cactus blooming near Thanksgiving, guess what?

Planting

Christmas cacti grow in most container soils. Ensure the soil drains well and your pots have drainage holes.
Plants should be kept in bright, indirect light.
A daytime temperature of 70 degrees F and an evening temperature of 60 to 65 degrees F is preferred.
In the summer, Christmas cacti can be placed in a shady spot in the garden or in an unheated porch until temperatures get below 50 degrees.

Care

  • As soon as the top inch of soil in the container feels dry to the touch, soak the soil until water runs through the pot’s drainage holes; discard water in the tray so the plant doesn’t sit in water. It’s especially important to water well during flowers.
  • From spring through early fall, feed every 2 weeks with a complete houseplant fertilizer. During the fall and winter feed the cactus monthly
  • Once flowers fade, continue to grow the plant as a houseplant.
  • Prune plants in June to encourage branching and more flowers. Simply cut off a few sections of each stem. Of you wish, root the cut-off pieces in moist vermiculite to make more plants. 
  • If your cactus is not blooming, it may due to amount of daylight or temperature. Flowers will only form when the temperature is between a cool 50 to 55 degrees F.
  • Nights need to be at least 14 hours long and daylight periods are between 8 to 10 hours for 6 weeks—for six weeks. If you have strong indoor lighting, you may need to cover your cacti at night.
  • If the cacti sheds its buds in a winter, it will bloom the following year.

Pests/Diseases

If your Christmas Cacti is exposed to any type of stress, the plant will drop its blossoms.  This could be related to amount of light, or a sudden change in temperature, as discussed in above plant care section. Also, ensure that your soil doesn’t get too dry.
The plant may be susceptible to mealy bugs and, if over-watered, root rot. If you have problems, cut out infected areas and repot in clean soil.

Recommended Varieties

Wit & Wisdom

Thursday, November 30, 2017

Year of the Rose: Best Types of Roses

Year of the Rose: Best Types of Roses

Best Types of Roses and Rose Care Tips

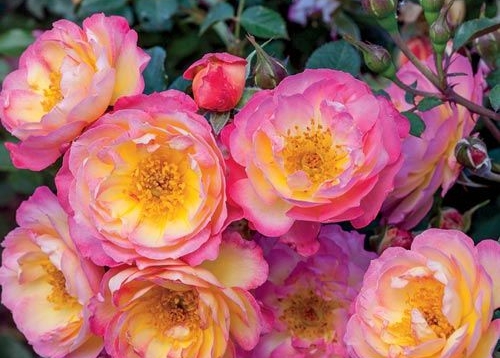
'Rainbow Happy Trails' rose. Photo by Brecks.com
‘Rainbow Happy Trails’ by Brecks.com.


‘Peace’ rose, a popular hybrid tea rose variety. Photo from Wikipedia.

'Fourth of July' Rose. Photo from WeeksRoses.com
‘Fourth of July’ rose from WeeksRoses.com.
Roses  https://www.almanac.com/content/year-rose-best-types-roses?trk_msg=2VSRIHU5GLG4VCTE58SQ2T4LRK&trk_contact=EEBLFVJ2I0VAQT9EM5JFVJAK9O&trk_sid=E88F86PTM63JKVEF64IUB53FK0&utm_source=Listrak&utm_medium=Email&utm_term=Year+of+the+Rose%3a+Best+Types+of+Roses+(read+more)&utm_campaign=Companion+Daily
In honor of the rose’s long and colorful history, as well as its place in gardens, the National Garden Bureau named 2017 the “Year of the Rose.” In celebration of the close of this rosaceous annum, let’s take a closer look at “the queen of flowers.” Here are some of the best rose varieties to grow in your garden!
Today, roses are enjoying new popularity. During the past 20 years, rose breeders, including Weeks Roses in Wasco, California, have been developing and introducing roses that require less maintenance and are more disease-resistant and fragrant. “Modern rosebushes are both beautiful and tough in a wide range of growing conditions, so they are easier to grow than ever before,” says Christian Bédard, research director for Weeks Roses.
One of the biggest challenges for gardeners can be knowing how to use roses, based on their growing habit. An understanding of the types of roses eliminates any woes.

The Origin of the Rose

It is believed that the cultivation of roses began about 5,000 years ago in China. During the Roman Empire, rose gardens were established in the Middle East. In the 17th century, kings and queens considered roses legal tender for purchases.
The era of the modern rose began in 1867, when French breeder Jean-Baptiste André Guillot introduced the first hybrid tea rose. The elegantly shaped buds soon became the standard look for a proper rose flower—a tradition that continues today.
Learn more about the history of roses and about some classic rose varieties.

Types of Roses

  • When most people think of roses, a hybrid tea rose comes to mind. Known for their long stems, these are ideal cut flowers. Hybrid tea rosebushes have a generally upright shape, and the plants reach 3 to 6 feet tall. Popular varieties of hybrid tea roses include ‘Pretty Lady Rose’, ‘Mr. Lincoln’, ‘Peace’, ‘Neil Diamond’, and ‘Marilyn Monroe’.
    • New in 2017 from Weeks Roses was a variety of hybrid tea rose called ‘All My Loving’, developed in England by Gareth Fryer. The 4- to 5-inch dark pink flowers sit atop long cutting stems and have 30 to 40 petals. ‘All My Loving’ performs particularly well in hot, sunny climates.
  • The floribunda rose, by contrast, generally blooms in clusters of smaller flowers. Popular floribunda varieties include ‘Iceberg’, ‘Julia Child’, ‘Ketchup & Mustard’, and ‘Angel Face’. A new variety of floribunda rose called ‘Easy to Please’ brings the added benefit of increased disease resistance. This variety, part of the Easy-to-Love collection from Weeks Roses, grows well in a wide range of climates and conditions. 
  • Climbing roses are the largest of the rosebushes. The canes of a full-size climbing rose can rise 10 to 12 feet tall. These plants do well when grown on a trellis, fence, or wall; regular pruning may be required. Some popular varieties of climbing roses include ‘Fourth of July’, ‘Above All’, and ‘Stormy Weather’. ‘Tropical Lightning’, also new from Weeks Roses, features blooms that mix sunset orange and smoky purple, with cream-color stripes. ‘Tropical Lightning’ also has improved disease resistance that makes it lower-maintenance.
  • Shrub roses are good choices for large landscapes or gardens. Their rounded growth habit can result in roses that are 3 to 5 feet tall and 3 feet wide. Shrub roses are vigorous, with large clusters of blooms. Popular varieties include ‘Home Run’, ‘Edith’s Darling’, and ‘Children’s Hope’. A new shrub rose variety called ‘Watercolors Home Run’ does not set seeds; all of the plant’s energy goes into producing flowers—its clusters of pink flowers with bright yellow centers just keep coming! ‘Watercolors Home Run’ is highly disease-free and has self-cleaning petals (meaning no deadheading required), making it a nearly maintenance-free plant.
    • Shrub roses that have low-growing and wide-spreading habits are called ground cover roses. Two new ground cover roses are ‘Rainbow Happy Trails’, which flowers with pink outer petals and golden centers, and ‘Sunshine Happy Trails’, with a profusion of sunny yellow flowers. 
Learn about the best disease-resistant roses.

Carefree Care

Roses have a reputation for requiring complicated care, but this needn’t be so, according to Christian Bédard. “You don’t need to do much to get the best new roses to grow well,” he says. “Newer varieties of roses are much more vigorous and disease resistant than older varieties. New roses such as ‘Watercolors Home Run’ and ‘All My Loving’ can thrive in most climates with no spraying and basic pruning at the beginning of the growing season.”
Learn about the easiest rose varieties to grow for beginners.

How to Grow Roses

Rosebushes—whether new varieties or heirloom varieties that have been available for decades—grow best in full sun with moist, well-drained soil that is rich in organic matter.
  • Light: For the best show of flowers and healthiest plants, rosebushes need to receive 6 to 8 hours of sunlight daily. In especially hot climates, roses do best when they are protected from the hot afternoon sun. In colder climates, planting a rosebush next to a south- or west-facing fence or wall can help to minimize winter freeze damage.
    • Select a sunny spot that will allow enough room for a mature plant. If planting several rosebushes together, space them at least 3 feet apart. Dig a hole deep and wide enough to accommodate the plant’s roots.
  • Soil: Roses thrive best in soils that retain water without becoming waterlogged. Amend the soil as needed: If your soil is heavy clay, mix in compost, peat moss, and other organic matter to improve drainage. Adding compost to lean, sandy soils helps to retain moisture near the plant’s roots.
  • Water: Water thoroughly. Then mound up loose soil around the canes to protect the rose while it acclimates to its new site. For best results, plant rosebushes on a calm, cloudy day. Planting on a hot, sunny day can stress a rose (or any type of plant).
    • Give the rose the equivalent of 1 inch of rainfall per week during the growing season. Water at the soil level to avoid getting the foliage wet; wet leaves can encourage diseases such as black spot and downy mildew.
See our Rose Growing Guide for more information on planting, growing, and caring for roses!

Best Rose Varieties by Climate

  • Hot and dry climates (U.S. Southern California and the Southwest): ‘Pretty Lady Rose’, ‘Neil Diamond’, ‘Doris Day’, ‘Tropical Lightning’, ‘Coretta Scott King’
  • Cool and wet climates (Pacific Northwest): ‘Violet’s Pride’, ‘Sparkle & Shine’, ‘Pretty Lady Rose’, ‘Oh My!’
  • Hot and humid climates (U.S. Southeast): ‘Watercolors Home Run’, ‘Home Run’, ‘Julia Child’, ‘Take It Easy’, ‘Easy to Please’
  • Cold-winter climates (Northeast and U.S. Midwest): ‘Watercolors Home Run’, ‘Cape Diamond’, ‘Party Hardy’, ‘Julia Child’, ‘Children’s Hope’, ‘Easy to Please’

Friday, November 17, 2017

Pumpkin Streusel Cake

Pumpkin Streusel Cake
Author: 
 
Ingredients
For the cake:
  • 2 cups all-purpose flour
  • 1½ tsp. of cinnamon
  • ½ tsp. ground nutmeg
  • ¼ tsp. ginger
  • 1 tsp. baking soda
  • ¾ tsp. salt
  • 1 cup butter , at room temperature
  • ¾ cup granulated sugar
  • ¾ cup brown sugar
  • 1 large egg
  • 2 tsp. vanilla extract
  • 1 cup canned pumpkin puree
  • 1 cup chocolate chips
For the streusel:
  • ⅔ cup all-purpose flour
  • ½ cup packed light brown sugar
  • ½ tsp. ground cinnamon
  • 6 Tbsp. cold butter , cut into small chunks
  • ½ cup chocolate chips
Instructions
  1. Preheat oven to 350 degrees. Spray a 9-by-13-inch baking pan with cooking spray. Set aside.
  2. In a medium bowl, combine the flour, cinnamon, nutmeg, ginger, baking soda, and salt, whisk together. Set aside.
  3. In the bowl of an electric mixer, cream butter and sugars until smooth. Add the egg and vanilla and mix well. Add the pumpkin puree and continue mixing until blended in. Reduce speed to low, and add the flour mixture, mixing until just combined. Stir in the chocolate chips. Spread batter evenly into the prepared pan.
  4. To make the streusel, in a medium bowl, combine the flour, brown sugar, and cinnamon. Add in the butter, and mix using 2 table knives, a pastry blender or your hands. Continue mixing until the mixture looks like coarse crumbs. (You can also do this in a food processors. Just give it a few pulses.) Sprinkle streusel evenly over the top of the cake. Sprinkle the chocolate chips over the cake.
  5. Bake for about 35-40 minutes. DO NOT OVERBAKE! (You want a few moist crumbs on the toothpick you insert.) Place cake on a wire rack and cool completely.

Joe Licata’s Best-Ever Coconut Cream Pie

Joe Licata’s Best-Ever Coconut Cream Pie

Yield: 

Makes 8 servings.

Thursday, November 9, 2017

Seasonal Crafts: How to Make a Nut Wreath

Seasonal Crafts: How to Make a Nut Wreath

Nut Wreath
Decorate for the holidays this season with this festive homemade nut wreath!
A wide variety of nuts is sold at holiday time. Fashion them into this charming decoration especially suitable for Thanksgiving.

Materials needed:

  • 1 straw or grapevine wreath form (10 to 12 inches)
  • an assortment of unshelled walnuts, chestnuts, filberts (hazelnuts), almonds, and brazil nuts
  • acrylic varnish
  • brush
  • wire
  • glue gun
  • pine sprigs, ivy, or small grape leaves (optional)
  • ribbon

Directions:

Monday, October 30, 2017

How to Get Rid of Bad Smells

How to Get Rid of Bad Smells

Natural Remedies for Bad Odors in the Home

Oct 13, 2017
Lemons 
There are many ways to mask bad smells in your home, but how do you truly get rid of them? Here’s how to get rid of bad smells once and for all!
Neuroscientists say humans can distinguish 10,000 scents, though we don’t have names for a lot of them.
Our sense of smell—the olfactory sense—brings depth and emotional richness to daily life. Think about the feelings and memories that flow when you catch a whiff of fresh-cut grass or lilacs in bloom, bury your face in a sun-dried bed sheet just off the line, or enter the kitchen just as a cinnamon-rich apple pie emerges from the oven.
Our olfactory system also alerts us to potential dangers: spoiled food, rot and decay, harmful molds. Most American homes contain a variety of sprays, plug-ins, stick-ons, scented candles, and other products designed to mask or remove bad odors. However, many people suffer allergic reactions to the fragrances in some of these products, and some air fresheners even contain toxins.
Yet a few inexpensive household essentials you probably have on hand already—vinegar, salt, coffee, baking soda, hydrogen peroxide—will neutralize most noxious odors around your home and in your vehicles.

How to Get Rid of Bad Smells

Saturday, October 28, 2017

Are They Poisonous?

Are They Poisonous?

Spiders are blamed for all kinds of things that turn out to be skin infections or some other bug’s fault. Most don’t even have fangs long enough to break your skin. When they do bite, they're typically harmless. In the U.S., only the black widow and brown recluse have venom strong enough to really hurt you. And their bites are rarely deadly to humans.https://www.webmd.com/skin-problems-and-treatments/ss/slideshow-spider-bites?ecd=wnl_wmh_102717&ctr=wnl-wmh-102717_nsl-ld-stry_1&mb=fjn57TBrIqlXyG%40%40f08MHJAyWFWqf9PL0Prbz5KLjJs%3d

What Do Bites Look Like?

They’re pretty much just like an insect bite. For the most part, you can’t tell a spider bit you just from your symptoms. You’ll get a little bump on your skin. It might get red, itchy, and swell up a bit. It might hurt, but no more than a bee sting and usually not for more than an hour or so. That’s basically it -- unless you're bitten by a venomous spider.

Friday, October 27, 2017

Apple Pull-Apart Bread Recipe

Apple Pull-Apart Bread Recipe

Ingredients

  • 1 package (1/4 ounce) active dry yeast
  • 1 cup warm milk
  • 1/2 cup butter or margarine, melted, divided
  • 1 egg
  • 2/3 cup plus 2 tablespoons sugar, divided
  • 1 teaspoon salt
  • 3 to 3-1/2 cups all-purpose flour
  • 1 medium tart apple, peeled and chopped
  • 1/2 cup finely chopped pecans
  • 1/2 teaspoon ground cinnamon
  • ICING:
  • 1 cup confectioners' sugar
  • 3 to 4-1/2 teaspoons hot water
  • 1/2 teaspoon vanilla extract

Directions

In a mixing bowl, dissolve yeast in milk. Add 2 tablespoons butter, egg, 2 tablespoons sugar, salt and 3 cups flour; beat until smooth. Add enough remaining flour to form a stiff dough. Turn onto a floured surface; knead until smooth and elastic, 6-8 minutes. Place in a greased bowl, turning once to grease top. Cover and let rise in a warm place until doubled, about 1 hour.
Combine apple, pecans, cinnamon and remaining sugar; set aside. Punch dough down; divide in half. Cut each half into 16 pieces. On a lightly floured surface, pat or roll out each piece into a 2-1/2-in. circle. Place 1 teaspoon apple mixture in center of circle; pinch edges together and seal, forming a ball. Dip in remaining butter. In a greased 10-in. tube pan, place 16 balls, seam side down; sprinkle with 1/4 cup apple mixture. Layer remaining balls; sprinkle with remaining apple mixture. Cover and let rise until nearly doubled, about 45 minutes. Bake at 350° for 35-40 minutes or until golden brown. Cool for 10 minutes; remove from pan to a wire rack. Combine icing ingredients; drizzle over bread. Yield: 1 loaf.
Originally published as Apple Pull-Apart Bread in Taste of Home August/September 1998, p39

Nutritional Facts

1 piece: 248 calories, 9g fat (4g saturated fat), 31mg cholesterol, 218mg sodium, 38g carbohydrate (19g sugars, 1g fiber), 4g protein.

Rocky Road Chocolate Cookies

Rocky Road Chocolate Cookies

Author:
Serves: 24
Ingredients
  • 2 (4 ounce) semi-sweet baking chocolate bars
  • 1 cup flour
  • ⅓ cup cocoa powder
  • 1 teaspoon baking powder
  • ¼ teaspoon salt
  • 5 tablespoons butter, room temperature
  • ½ cup brown sugar
  • ½ cup granulated sugar
  • 2 large eggs, room temperature
  • 1 teaspoon vanilla
  • ¾ cup walnut pieces
  • 1 cup mini marshmallows, divided
  • 1 cup milk chocolate bars (about 3 1.5 ounce bars), chopped, divided
Instructions
  1. Melt the semi-sweet chocolate bars in the microwave and let cool.
  2. In a mixing bowl, combine four, cocoa powder, baking powder, and salt together. set aside.
  3. In the bowl of a stand mixer, with the paddle attachment, beat butter and sugars together for 2 minutes. Add the eggs and vanilla and mix until smooth. Add the dry ingredients and mix until combined, scraping the sides as needed.
  4. Use a wooden spoon or a spatula to mix in the walnuts, ½ cup marshmallows, and ½ cup chopped chocolate.
  5. Cover dough and refrigerate at least 2 hours. If chilled longer, let it sit on the counter for 30 minutes before rolling.
  6. Preheat oven to 350 degrees and line baking sheet with parchment paper or silpat mats.
  7. Scoop dough and form into (24) 1½ inch balls. Place 3 inches apart on pan. Bake for 11 minutes and then press 3 marshmallows into the tops of each. Return to oven and cook for 1 more minute. Press in a couple more chocolate chunks and let cool on the pan for 5 minutes. Then move to a cooling rack.

Almond Joy Poke Cake

A moist chocolate cake covered in a gooey coconut mixture and topped with a rich chocolate icing and sliced almonds.
Author:
Ingredients
  • 1 (15.25 oz.) box Devil's Food Cake Mix
  • Ingredients on the box to make cake (eggs, oil, water)
  • 1 (14 oz.) can sweetened condensed milk or 1 (15 oz.) can cream of coconut
  • 2 c. shredded coconut
  • ¾ c. sliced almonds
  • Chocolate Icing
  • 4 Tbl. unsalted butter
  • 4 Tbl. unsweetened cocoa powder
  • 2 c. powdered sugar
  • 1½ tsp. vanilla extract
  • 3 Tbl. milk
Instructions
  1. Prepare cake mix and bake according to package directions for a 9x13-inch cake. When cake is done, while it is still warm, poke holes all over the cake using a toothpick or a fork. Stir together sweetened condensed milk or cream of coconut and the shredded coconut and pour/spread over the warm cake. It will be thick. Allow to cool. Some of the mixture will sink down into the holes in the cake. When cake is cool, make the chocolate icing.
  2. For the Chocolate Icing: Melt butter in a medium sauce pan over medium heat. Stir in the cocoa powder until no lumps remain. Remove from heat and stir in the powdered sugar, vanilla and milk. Stir together until smooth and creamy and immediately pour over the cooled cake. Spread out evenly. Top with sliced almonds and allow icing to harden. I like to refrigerate the cake overnight, so it's nice and firm and easier to cut into slices.

Monday, October 23, 2017

Apple Cheesecake Bars

Apple Cheesecake Bars

Apple Cheesecake bars
Author: 
 
Ingredients
For the Crumb Topping:
  • ½ cup all-purpose flour
  • ½ cup light brown sugar
  • ¼ cup quick-cooking oats
  • ¼ cup unsalted butter, at cool room temperature
For the Shortbread Crust:
  • 1 cup all-purpose flour
  • ¼ cup light brown sugar
  • Pinch of salt
  • ½ cup unsalted butter, at cool room temperature
For the Filling:
  • 8 ounces cream cheese, at room temperature
  • ¼ cup + 1 tablespoon granulated sugar, divided
  • 1 egg
  • ½ teaspoon vanilla extract
  • Pinch salt
  • 2 small apples (any variety), peeled, cored and finely chopped
  • ¼ teaspoon ground cinnamon
  • ⅛ teaspoon ground nutmeg
Instructions
  1. Preheat oven to 350 F. Line an 8-inch square baking pan with aluminum foil or parchment paper, leaving an overhang on all sides. Spray the foil with non-stick cooking spray. but no need to spray the parchment paper, if you are using that.
Make the Crumb Topping:
  1. In a small bowl, stir together the flour, brown sugar and oats. Using a fork, your fingers or a pastry blender, work the butter into the dry ingredients until the mixture becomes crumbly. Refrigerate the topping while you prepare the bars.
Make the Crust:
  1. In a medium bowl, whisk together the flour, brown sugar and salt. Add the butter and, using a pastry blender, cut the butter into the dry ingredients until the mixture resembles wet sand. Turn the mixture into the pan and press into an even layer. Bake for 15 minutes, or until light brown and set. Remove the pan to a wire rack.
Make the Filling: Using an electric mixer on medium speed, beat the cream cheese with ¼ cup of the sugar until it’s well-combined and smooth, scraping the sides of the bowl as needed. Add the egg, vanilla and salt, and beat just until the mixture is uniform. Pour over the crust and smooth into an even layer.
  1. In a small bowl, toss the apples with the remaining 1 tablespoon of sugar, the cinnamon and nutmeg, ensuring that the apples are evenly coated. Distribute the apples evenly over the cream cheese mixture. Sprinkle the crumb topping evenly over the apples.
  2. Bake for 30 to 35 minutes, or until the filling is set and the center does not jiggle. Remove the pan to a wire rack and let the bars cool completely before serving or if desired, cover the pan with plastic wrap and refrigerate for a few hours..I think they are best chilled. The bars can be kept in an airtight container in the refrigerator for up to 4 days.
  3. *If you want to take them up a notch, you could drizzle them with caramel sauce before serving.

Saturday, October 21, 2017

Crochet Stones Will Look Beautiful In Your Home

Crochet Stones Will Look Beautiful In Your Home 

Here’s a lovely idea we know you will be keen to try. The Blogger takes smooth sea stones and covers them with crochet ..

Crochet Covered Stones - free pattern on our site 
These stones will look amazing in your home and they are very easy to recreate! Don’t they look absolutely gorgeous grouped together in a bowl.
They would make a fabulous centerpiece and it’s the perfect way to use up all your left over yarn. They would also make ideal paper weights. Margaret says her instructions are for a stone 5 centimeters in diameter.
Crochet Covered Stones Free Pattern  You can however, adapt the pattern to fit any size. It’s a lovely beginner friendly project and she says that if you can crochet a chain, make a single and double crochet stitch, then you will easily be able to make a crochet cover for a stone.https://thewhoot.com/crochet/urchin-crochet-sea-stones?omhide=true

Friday, October 20, 2017

Pumpkin Pickles

Pumpkin Pickles

Thursday, October 19, 2017

How to Overwinter Your Plants and Garden

How to Overwinter Your Plants and Garden

Overwintering Roses, Geranium, Rosemary, and More Plants


autumn-garden-overwintering-plants 
Learn how to properly overwinter your garden plants to keep them protected from snow, wind, and freezing temperatures. They’ll thank you in the spring!

How to Overwinter Geraniums

Before the first frost (find frost dates for your region here), cut plants back to about 6 to 8 inches. Then lift the plants and cut back the roots. Put the trimmed plants in the smallest pots possible—containers just large enough to fit the roots. Fill the remaining space in the pot with regular potting soil. Keep the plants in the shade for a week and then place them in a sunny spot indoors. When new growth starts, cut off all the old leaves.

How to Overwinter Rosemary

This culinary herb prefers life in a pot and can successfully survive as a houseplant from year to year.
Before a frost in the fall, dig it up, plant it in a pot, and bring it indoors. Place it in a sunny window and keep it evenly watered. Mist the leaves frequently or place the entire plant in the shower and give it a good rinse once a month. The plant may start to look a little tired by March, but it will perk up once you return it to the garden. Dig a hole in the late spring, after all danger of frost has passed, and set the plant back into the soil.
Learn more about overwintering rosemary.

How to Overwinter Roses

Roses need thick insulation to help them stay dormant. For those that are grafted, such as hybrid teas, make sure that their graft unions are covered with soil to insulate them from low temperatures. After a freeze or two, mound 12 inches of soil around the base of the rosebush.
Nongrafted roses, such as rugosas and antiques, don’t need much protection. Just mulch the ground around them with a couple of inches of straw or shredded leaves.https://www.almanac.com/extra/how-overwinter-your-plants-and-garden?trk_msg=31NTUF6B568KBDPBHPRVH8QJH4&trk_contact=EEBLFVJ2I0VAQT9EM5JFVJAK9O&trk_sid=MAMTJLFF28651C3MG9P7RF7NF0&utm_source=Listrak&utm_medium=Email&utm_term=How+to+Overwinter+Your+Plants+and+Garden+(title)&utm_campaign=Companion+Daily

Tuesday, October 17, 2017

How to Make Apple Cider With a Press Making Apple Cider

How to Make Apple Cider With a Press

Making Apple Cider
My friends received an apple cider press for a wedding present long ago. Last week, they threw an Apple Cider Press Party, and what a treat!
Have you ever tasted apple cider fresh from the press (your own or a local cider mill)? WOW! The cider has a pure, refreshing flavor that’s hard to beat.
Frankly, I was never crazy about apple cider before. However, I humbly revise my opinion. The difference between the taste of pasteurized, filtered grocery store cider and homemade cider is remarkable. With the cider press, we’re talking 30 seconds from press to glass.
For the uninitiated (formerly, yours truly), an apple cider press is a machine that essentially grinds up the apples into pulp and then presses the juices out.
In colonial days, it was common for farmers and families to own a barreled cider press (and in those days, the cider was often left to ferment and become an alcoholic “hard” cider). Today, I have a feeling that the old-fashioned cider press is becoming more popular again, perhaps because more people are planting fruit trees.

Here’s how the pressing process works:

  • Start with a wheelbarrow of apple drops (fallen apples). You need a good amount of apples to make cider—about 5 times the volume apples to the volume of juice.
  • The apples need to be as ripe as possible, but it’s fine to use less-than-perfect apples on the ground at any orchard or old apple farm. (Discard any rotten ones, though.) Blast the apples with a hose to wash them off. 

Sunday, October 15, 2017

Best Plants That Purify The Air In Your Home

Best Plants That Purify The Air In Your Home

Learn about the plants that purify the air in your home. We have the Nasa Infographic that contains lots of great information. View it now …

 
There are so many toxins and chemicals swirling around our homes. The good news is you can cleanse the air with certain houseplants.
We have tracked down the Nasa findings in a handy infographic and it has lots of great information that you won’t want to miss.http://thewhoot.com.au/life/plants-purify-air-home?omhide=true

Friday, October 13, 2017

How to Cook Pumpkin

How to Cook Pumpkin

The Easiest Way to Cook Pumpkin

Pumpkin Pile  Here’s how to cook pumpkin the simplest way—plus a selection of delicious pumpkin recipes, from our Blue Ribbon Pumpkin Pie to pumpkin spice pancakes!

How to Cook a Pumpkin

  1. First, scrub the outside of the pumpkin with a vegetable brush to remove any dirt. 
  2. Cut the pumpkin in half and use a spoon to scrape out the fibers and the seeds. A serrated grapefruit spoon works great for this.
  3. Cut the pumpkin halves into smaller pieces, then place them skin side up in a shallow baking dish.
  4. Add water to just cover the bottom of the dish, and cover tightly.
  5. Bake in a 325ºF oven until the pumpkin is fork tender. The time will vary depending on the size of your pieces.
  6. Let it cool, and then either cut off the peel or scoop out the flesh.
Tip: For pumpkins that you’re not cooking right away, keep them cool but not quite as cool as root crops. If you have a coolish bedroom, stashing them under the bed works well (just don’t forget about them). They like a temperature of about 50 to 65ºF. https://www.almanac.com/content/how-cook-pumpkin?trk_msg=29602QAECHJ4JA40G0NGIVNK9S&trk_contact=EEBLFVJ2I0VAQT9EM5JFVJAK9O&trk_sid=61S7IBUV83GR5IO6N6DFPN723S&utm_source=Listrak&utm_medium=Email&utm_term=How+to+Cook+Pumpkin+(title)&utm_campaign=Companion+Daily

Shrubs and Trees for Fall

Fall Garden: Shrubs and Trees for Fall

A Garden to Fall For

George and Becky Lohmiller
Autumn Tree Get those beloved colors of autumn right in your own yard with a beautiful fall garden.
Many gardeners prefer autumn to any other season. The heat and humidity of summer have passed, biting insects are gone, and the leaves of many plants paint the landscape with bold strokes of red, yellow, orange, and purple.
With a little planning, you can create a fall garden that will rival the bright new leaves and flowers of spring gardens.
To choose plants for a fall garden, visit a nursery with paper, pencil, and camera in hand. Take notes and snapshots and ask questions:
  • Does the plant have colorful berries for winter interest?
  • Will it attract birds?
  • How will it look in other seasons?
 https://www.almanac.com/content/fall-garden-shrubs-and-trees-fall?trk_msg=29602QAECHJ4JA40G0NGIVNK9S&trk_contact=EEBLFVJ2I0VAQT9EM5JFVJAK9O&trk_sid=61S7IBUV83GR5IO6N6DFPN723S&utm_source=Listrak&utm_medium=Email&utm_term=Fall+Garden%3a+Shrubs+and+Trees+for+Fall+(title)&utm_campaign=Companion+Daily

Thursday, October 12, 2017

How To Use Epsom Salt Around Your Garden

How To Use Epsom Salt Around Your Garden

You will be amazed at the amount of Epsom Salt Garden Uses that there are and Roses are just one of many that we have found ..

 
How would you like to improve your Roses by growing big beautiful flowers that were healthy and brighter?
Well, now you can, and all the while using a very inexpensive, common household ingredient. We are talking about Epsom Salt. 
http://thewhoot.com.au/whoot-news/diy/epsom-salt-for-gardens?omhide=true

LadyBug Garden Tidbit Of The Month

LadyBug Garden Tidbit Of The Month

St.Lukes Indian Summer~Tidbit Of The Month

http://www.almanac.com/fact/st-lukes-little-summer-lovely-summerlike-days-saint
Lovely, summer like days that occur around October 18 are called Saint Luke’s Little Summer in honor of the saint’s feast day. Around this time, Saint Luke’s feast day, there is a period brief period of calm, dry weather. Of course, it’s difficult to generalize today across the vast continent of North America, but the temperature is usually mild and the leaf colors are turning a gorgeous color. It’s a good time for a brief vacation or visit to a park. In Venice, Italy, they say: “San Luca, El ton va te la zuca” (Pumpkins go stale on St Luke’s Day), but here in North America, pumpkins are enjoying their finest hour. Saint Luke is the patron saint of physicians and surgeons so it seems only fitting that the good doctor give us these calm days. In olden days, St. Luke’s Day did not receive as much attention in the secular world as St. John’s Day (June 24) and Michaelmas (September 29), so it was to keep from being forgotten that St. Luke presented us with some golden days to cherish before the coming of winter, or so the story goes. Some folks call this Indian Summer, but that officially occurs between November 11 and November 20.

When To Plant Mums

When To Plant Mums
Tip of the month

How To Make A Succulent Wreath

How To Make A Succulent Wreath
This turns Out So Pretty! Click on picture for directions

LadyBug Painted Rocks

LadyBug Painted Rocks
For Your Garden

Painted Garden Rocks

Learn to make these adorable ladybug painted rocks. use special outdoor paint for this adorable garden craft so you can keep garden ladybugs…

Ingredients

  • Patio Paint in colors of your choice (I used Larkspur Blue, Petunia Purple, Fiesta Yellow, Fuchsia, Citrus Green and Salmon)

  • Smooth rocks, preferably oval or round in shape

  • Paintbrush

  • Toothpick

  • Outdoor sealer or Patio Paint Clear Coat

Do It Yourself Projects

Do It Yourself Projects
Harvest~Autumn Costume

LadyBug Directions

Ladybugs are the one crawly creature most kids find fun, cute and friendly. Any child will feel the same wearing this simple, comfortable costume.

Materials Needed:

2 pieces (12 x 18 inches) stiff red felt
1 piece (12 x 18 inches) black felt
2 hook-and-loop stick-on buttons
2 large black chenille pipe cleaners
1 regular black pipe cleaner
1 square (12 inches) stick-on black felt
1 black headband
1 black turtleneck top
1 pair black leggings


Step 1

To make the ladybug's wings, draw a semicircle on each piece of stiff red felt. You can attach a 12-inch piece of string to a pencil and, holding the string end midway on the 18-inch side of the felt, draw a semicircle by swinging the pencil in an arc. Curve the top of each wing as shown at right.

Step 2

To make the yoke, fold the black felt piece in half lengthwise. At the center of the folded edge, cut a 5-inch, curved neck opening. Curve the outer edges of the yoke and cut the center open as shown in the photo.

Step 3

Attach the top of the wings to the back of the yoke with glue or needle and thread. Add hook-and-loop buttons to either side of the yoke opening. Sew or glue the large chenille pipe cleaners to the outside joints between the yoke and the wings: these are the bug's extra legs.

Step 4

Use a glass to trace 7 black dots on the stick-on black felt. Cut out the dots and stick them to the ladybug wings as shown in the photo.

Step 5

Glue the center of the regular black pipe cleaner to the center of the headband. Reinforce it with a strip of black stick-on felt. Curl ends of pipe cleaner to complete the antennae.

Step 6

Dress the child in the black turtleneck, leggings, wings with yoke and headband.


Cute Harvest Costume

Cute Harvest Costume
Click on photo for directions

LADYBUG PHOTO'S

LADYBUG PHOTO'S

LadyBug Recipe Today

LadyBug Recipe Today
I love to search, find, share recipes to cook,bake and serve.